Pattern Description:
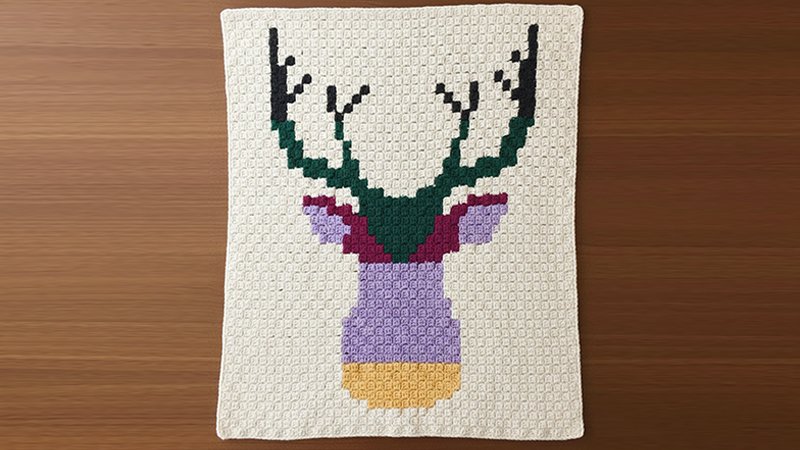
This free corner to corner (C2C) crochet pattern creates an ombre deer silhouette afghan. It utilizes a c2c graph pattern to construct the design.
The pattern is suitable for creating a blanket that fits well in a baby nursery, dorm room, or man cave.
While the antlers are detailed, the blanket uses large sections of color, making the color changes more approachable for those new to creating a graphgan.
Materials Needed & Measurements:
The pattern requires Lion Brand Vanna’s Choice Yarn (100 g/170 yards).
Yarn & Colors (Quantities listed are skeins needed):
- Linen: 6 (13 are needed for the larger throw size).
- Pistachio: 1.
- Aquamarine: 1.
- Aqua: 1.
- Peacock: 1.
- Sapphire: 1.
- Navy: 1.
Tools & Supplies:
- Size H [5.0 mm] crochet hook.
- Tapestry needle.
- Scissors.
- Corner to corner crochet deer graph.
- Row-by-row written pattern (optional, available in the PDF).
Measurements & Gauge:
- Gauge: 4.5 tiles equals 4 inches.
- Sizes:
- Baby blanket: 38.5” x 42.5”. (The free graph pattern is available for this size).
- Larger Throw: 44” x 55”. (The graph and written instructions for this size are available in the ad-free PDF).
Abbreviations (US Terms) Used:
- sc – single crochet
- dc – double crochet
- sk – skip
- ch – chain
- sl st – slip stich
- RS – right side
- c2c – corner-to-corner stitch (the primary stitch used for the afghan)
Instructions for Making the Corner to Corner Crochet Deer Afghan Pattern:
Pattern Fundamentals
This afghan is created using the corner-to-corner stitch (c2c) technique, resulting in an ombre deer silhouette design. The pattern is structured as a graphgan, meaning you follow a visual graph to create the image. The c2c deer pattern is considered a good starting point for graphgans due to its large sections of color, making the color changes more approachable before reaching the more detailed antlers.
A visual tutorial on how to read a c2c graph may be helpful for beginners. For those unfamiliar with the technique, specific tutorials are available on how to c2c for beginners, as well as instructions on how to change colors in c2c crochet.
Working the C2C Graph
To start the afghan, begin with the pixel (or tile) in the lower right corner of the graph, which corresponds to Row 1 of the written pattern. Each pixel on the graph is equivalent to one tile in your afghan.
The structure of one tile is defined as: 3 ch (known as the turning chain or tch) + 3 dc.
It can be extremely helpful to track your progress by crossing off each row in the graph and/or written pattern as you complete it.
When working the afghan, note that there is an inherent difference in how c2c looks depending on whether you are working a RS (Right Side) or WS (Wrong Side) row.
Managing Shaping and Decreases
The afghan uses increases and decreases to form its shape. Once you have completed the top right corner of the afghan, every subsequent row will begin with a decrease.
For context on shaping, during the body section, rows are typically built up until you reach the maximum width/height.
For example, during the increase phase, shaping requires performing an increase at the start of a row (like Row 51) while simultaneously stopping one tile short of where you usually end the row, thereby creating an edge on the left side of the afghan and beginning the decrease/shaping process.
Adding a Border
Once the final tile of the main afghan body is completed, rotate the afghan so that the RS is facing. The border stitches should be worked loosely enough that they do not cause the afghan to pucker; if necessary, consider increasing your hook size.
Round 1: Ch 1, work 2 sc into each tile around the afghan. When you reach a corner tile, place [2 sc, 2 ch, 2 sc] in that corner tile. Sl st to the first sc of the round to join.
Round 2: Ch 1, sc in each sc around. When you reach a ch-2 corner space, work [sc, ch 1, sc] into that space. Sl st to the first sc of the round to join. Fasten off.
Finishing
After the border is complete, the final step is to weave in ends.