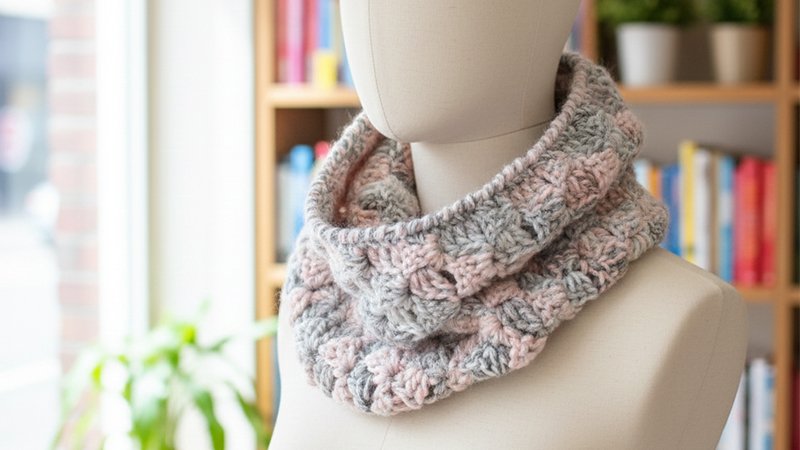
Pattern Description:
This free pattern is for an Easy C2C Crochet Cowl, which is ideal for beginner crocheters or for a calming project.
The cowl is created by crocheting a long rectangle using the Corner-to-Corner (C2C) stitch, which is essentially building blocks.
Each block consists of 3 chains and 3 UK trebles (US double crochets). Once the main piece is complete, the edging is finished using the Crab stitch.
Materials Needed & Measurements:
| Item | Details | |
| Yarn | King Cole Cotswold Chunky (80% acrylic/20% wool, 100g/130m per ball) in Broadway (2381). | |
| Quantity | Four balls. (This may leave leftovers, which were used to make pom poms). | |
| Hook | 5.5 mm (US I/9) crochet hook. (If the fabric works up stiff, try a 6mm hook). | |
| Tools | Darning needle (used to sew in ends and sew the ends of the cowl together). | |
| Finished Size | 43 x 40 cm (17 x 16 inches). |
Abbreviations:
- beg – beginning
- ch – chain
- ch-sp – chain space
- dc – double crochet (US single crochet)
- prev – previous
- rep – repeat
- ss – slip stitch
- st(s) – stitch(es)
- tr – treble (US double crochet)
- yrh – yarn round hook
Construction Note:
- 1 block = 3 ch + 3 tr
Instructions for Making the Easy C2C Crochet Cowl Pattern:
Beginning the Cowl (Increase Section)
The cowl begins at a single block and grows steadily until it reaches a width of 18 blocks.
Row 1 – Increase
- Ch 6.
- Work 1 tr into the 4th ch from hook, then 1 tr in each of the next 2 st(s).
- Turn. ➡ You now have 1 block.
Row 2 – Increase
- Ch 6.
- Work 1 tr into 4th ch from hook and 1 tr in each of next 2 st(s).
- Ss into the 3ch-sp of the prev row.
- Ch 3, work 3 tr into the same ch-sp.
- Turn. ➡ You now have 2 blocks.
Row 3 – Increase
- Ch 6.
- Work 1 tr into the 4th ch from hook and 2 more tr.
- Ss into the next 3ch-sp of prev row.
- Ch 3, work 3 tr in same ch-sp.
- Rep this sequence across each ch-sp to the end.
- Turn. ➡ This creates 3 blocks, and each new row adds one more.
Rows 4-18 – Increase to Full Width
- Rep Row 3 for each row.
- At Row 18, you should have 18 blocks.
Maintaining the Rectangle (Straight Rows)
This section keeps the width at 18 blocks while building length.
Row 19 – Straight Edge Start
- Ss across the first 3 st(s) and into the first 3ch-sp.
- Ch 3, work 3 tr in the same ch-sp.
- Continue making blocks in each 3ch-sp until the end.
- Turn. ➡ Still 18 blocks.
Row 20 – Begin Shaping (Decrease on One Side)
- Work Row 3 as before, but end the row by making a ss into the last 3ch-sp without adding a block.
- Turn. ➡ You now have 17 blocks.
Rows 19 & 20 – Repeat Sequence
- Rep Rows 19 and 20 a total of 7 times.
- This keeps one side straight while gradually reducing blocks on the other.
Final Decrease Section
You now begin shaping both ends to taper the rectangle for a smooth finish.
Row 33
- Ss across the first 3 st(s) and into the first 3ch-sp.
- Ch 3, 3 tr in the same space.
- Continue making blocks and end with 1 ss into the final 3ch-sp, without working a final block.
- Turn. ➡ 17 blocks remain.
Rows 34-49 – Full Decrease
- Rep Row 33 for each row.
- Each row decreases by 1 block, ending with no blocks left.
Final Step of Body
- Ss into each of the last 3 st(s) and then into the corner.
- Fasten off.
4. Edging (Along Long Sides)
The edging adds strength and a polished finish.
Row 1 – Foundation
- With RS facing, reattach yarn.
- Ch 1 (does not count as a st).
- Work 2 dc into the horizontal bars of each tr, and 1 dc into each of the 3 vertical tr.
- Continue to end of the row.
- Do not turn.
Row 2 – Crab Stitch (Reverse dc)
- Ch 1.
- Work crab stitch (reverse dc) across the entire row.
- Fasten off.
Other Side
- Reattach yarn to opposite long edge and rep Rows 1 & 2.
Blocking and Finishing
- Pin your rectangle onto blocking boards.
- Lightly steam (without touching fibers directly) for improved drape.
- Fold rectangle with RS together and align short edges.
- Sew ends using mattress stitch or whip stitch.
- Turn RS out.
Your Easy C2C Crochet Cowl is complete- beautiful, textured, and ready to wear!