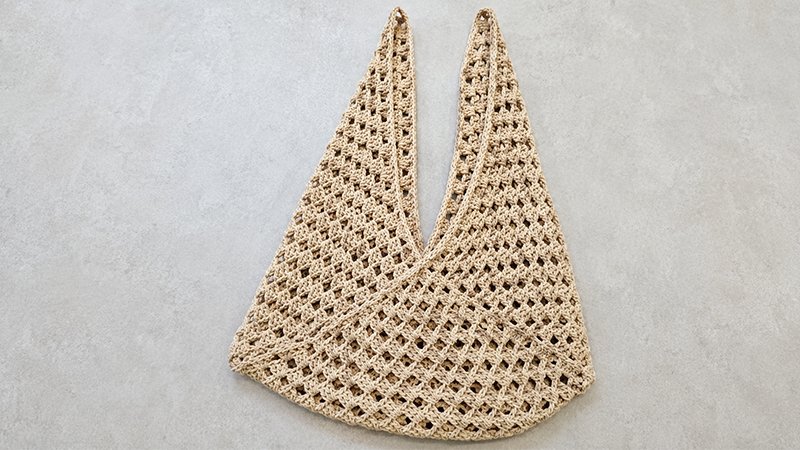
Constructing a handmade tote bag using traditional crochet motifs offers a stylish and durable accessory for daily errands.
By combining classic stitch patterns with simple geometric assembly, you can transform flat fabric motifs into a functional three-dimensional market sack.
This project utilizes standard cotton yarn, known for its structure and strength, making it ideal for carrying everyday essentials without excessive stretching.
Whether you are aiming to refine your join-as-you-go technique or searching for a practical stash-busting project, this easy-to-follow guide walks you through every stage from motif construction to finishing the handles.
Project Overview & Materials
-
Yarn Requirements: Approximately 550 yards of Category 4 medium weight yarn (100% mercerized cotton recommended)
-
Hook Size: 4.00 mm (US G/6) crochet hook
-
Notions: Tapestry needle and scissors
-
Gauge: Individual finished motif measures approximately 14 inches by 14 inches
-
Finished Dimensions: 20 inches wide by 20 inches tall
Step 1: Create the First Base
-
Round 1: Form a magic ring. Chain 3 (counts as first double crochet), work 2 double crochets into the ring. Chain 3, work 3 double crochets into the ring. Repeat from * to * 2 more times. Chain 3, then slip stitch into the top of the initial chain-3 to close the round.
-
Round 2: Slip stitch across to the first chain-3 corner space. Chain 3, then in the same corner space work 2 double crochets, chain 3, and 3 double crochets. Chain 1, then in the next corner space work 3 double crochets, chain 3, and 3 double crochets. Repeat from * to * 2 more times. Chain 1, then slip stitch into the top of the initial chain-3 to join.
-
Round 3: Slip stitch to the corner space. Chain 3, then work (2 double crochets, chain 3, 3 double crochets) in the same corner. Chain 1, work 3 double crochets in the side chain-1 space, chain 1, then work (3 double crochets, chain 3, 3 double crochets) in the corner space. Repeat around. Slip stitch to the top of the starting chain to join.
-
Rounds 4–13: Continue building the motif following the established pattern—placing (3 double crochets, chain 3, 3 double crochets) in every corner space and (3 double crochets, chain 1) in every side space. Fasten off after Round 13.
Step 2: Assemble Two and Three
-
Second: Work Rounds 1 through 12 identically to the first piece. On Round 13, align one side of your new piece to the completed first piece. Secure two adjacent edges together by swapping out standard chain spaces for slip stitches directly into the matching spaces of the finished motif. Fasten off.
-
Third: Work Rounds 1 through 12. On Round 13, join two sides to the existing assembly using the join-as-you-go slip-stitch technique along the corresponding edges. This forms a folded, pocketed structure. Fasten off.
Step 3: Edging and Strap Formation
-
Upper Border: Join yarn to any unworked chain space along the top edge of the bag opening.
-
Edge Rounds: Work slip stitches continuously along the raw edges of the top motifs, bridging the center point to secure the structure and create integrated handles.
-
Completion: Repeat the border process on the opposite side to balance the handles. Fasten off all working threads.
-
Finishing: Weave in all loose ends securely using a tapestry needle. Lightly steam-block the completed bag if necessary to crisp up the edges.