Pattern Description:
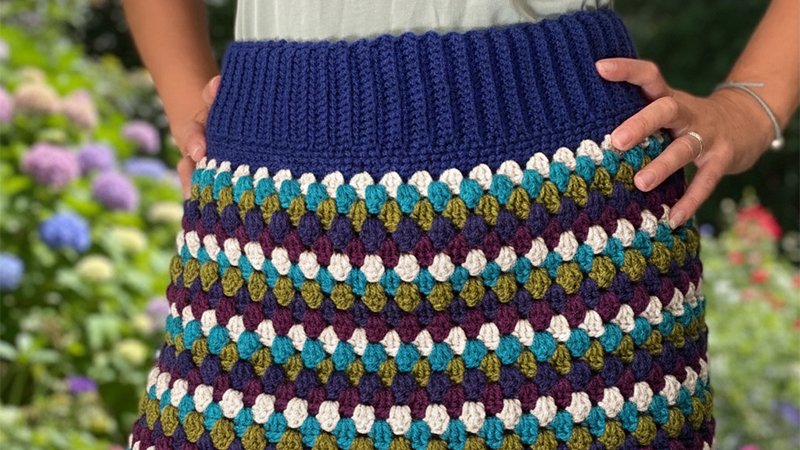
This Easy Granny Stripe Skirt Crochet Pattern is a quick, colorful, and beginner-friendly project that whips up vintage-inspired vibes.
It uses classic granny stitches, which are clusters of double crochets, and is worked in the round from the hem up.
The design is highly customizable, allowing adjustment of the length, colors (single color or rainbow-striped), and waistband for a perfect fit.
Materials Needed & Measurements:
| Category | Detail | |
| Yarn | Caron Cinnamon Swirl Cakes Yarn in Maitai (2 skeins) | |
| Crochet Hook | U.S. H/8 (5 mm) | |
| Gauge | 13 sc and 14 rows = 4 inches | |
| Sizes Available | S, M, L | |
| Hip Measurements | S: 33-36 inches; M: 38-40 inches; L: 42-44 inches | |
| Starting Chain | 120 (S) / 132 (M) / 144 (L) stitches | |
| Main Body Length | Repeat rounds until work measures approximately 16 (16 – 17) inches | |
| Drawstring Chain | 140 (S) / 152 (M) / 164 (L) stitches |
Abbreviations Used
- Ch – Chain
- st(s) – Stitch(es)
- sl st – Slip Stitch
- sc – Single Crochet
- hdc – Half Double Crochet
- dc – Double Crochet
- rnd – Round
- rep – Repeat
- sp – Space
Instructions for Making the Granny Stripe Skirt Pattern:
Foundation and Initial Round
- Starting Chain Ch 120 (132 – 144). (Sizes S, M, L, respectively). Join with sl st to the first ch to form a ring. Be careful not to twist the chain.
- Rnd 1 (Foundation sc) Ch 1. 1 sc in each ch around. Join with sl st to the first sc. You should have 120 (132 – 144) sc.
Granny Cluster Pattern
Begin working in the Granny Cluster Pat as follows:
Rnd 1 (Granny) Ch 2. 3 dc in the same st as the sl st. Skip the next 2 sc. 3 dc in the next sc. Skip the next 2 sc. Rep from to the end of the rnd. Join with sc to the top of the first st.
Rnd 2 Ch 2. 3 dc around the joining sc. Skip the next 3 dc. 3 dc between the 3 dc just skipped and the next 3 dc. Rep from to the end of the rnd. Join with sc to the top of the first st.
Rnd 3 Same as the 2nd rnd.
Main Body Repeat Rep the 2nd and 3rd rnds until the work from the beginning measures approximately 16 (16 – 17) inches.
Tip: If you desire a longer skirt, continue adding rounds until it reaches the desired length.
Waistband and Facing
- Rnd 1 (sc) With A (color A, although a specific color is not defined in the source, the notation “With A” suggests a yarn color change or re-establishment), ch 1. Skip the joining sc. 1 sc in each st around. Join with sl st to the first sc. You should still have 120 (132 – 144) sc.
- Rnd 2 (Front Loop hdc) Ch 2. Working in front loops only, 1 hdc in each sc around. Join.
- Rnd 3 (Drawstring Openings) Ch 2. Working in both loops, 1 hdc in each of the next 58 (64 – 70) sts. Ch 1. Skip the next hdc. 1 hdc in each of the next 2 (2 – 2) hdc. Ch 1. Skip the next hdc. 1 hdc in each st to the end of the row. Join with sl st to the first hdc.
- Rnd 4 (Back Loop hdc) Ch 2. Working in back loops only, 1 hdc in each sc and ch-1 sp around. Join.
- Rnd 5 (hdc) Ch 2. Working in both loops, 1 hdc in each hdc around. Join. Fasten off.
Drawstring and Finishing
- Drawstring Construction :Ch 140 (152 – 164). Row 2: Sc across.
- Finishing: Fold the Waistband between the 3rd and 4th rnds, ensuring all sts are aligned. Slip stitch around the waistband to secure the facing and form the drawstring casing. To insert the drawstring, attach it to a paper clip and thread it through the casing.
This skirt, which uses classic granny stitches, is a joyful and creative way to bring retro charm to a handmade wardrobe.