
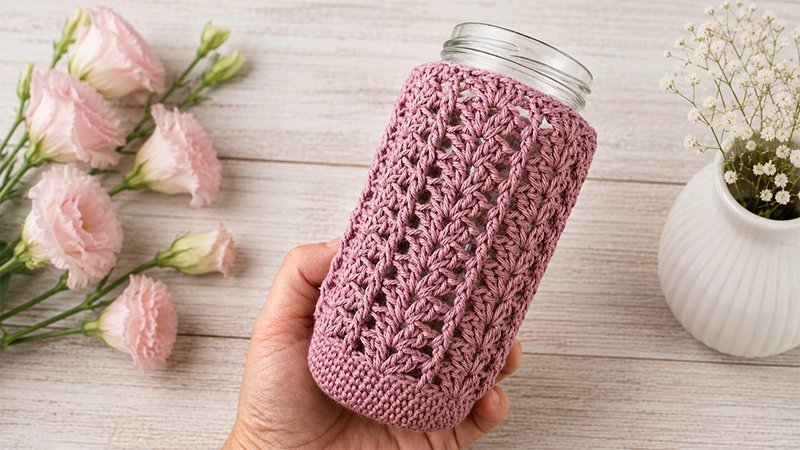
This crochet pattern allows you to upcycle plain glass jars into beautiful, texture-rich accents for your home. By combining a flat, sturdy base with an elegant shell-and-post stitch body, this cozy stretches gently to hug the contours of your jar.
It is an excellent scrap-busting project that works up quickly, making it ideal for handmade gifting, organizing craft spaces, or creating eye-catching merchandise for craft fairs.
Pattern Overview
-
Skill Level: Advanced Beginner / Intermediate
-
Terminology: US Crochet Terms
-
Sizing: Fully customizable (adjustable to any jar diameter and height)
-
Gauge: Not critical; size is determined by measuring against your specific jar as you work.
Material Recommendations
-
Yarn: Light Worsted (DK / #3 weight) or Sport (4-ply / #2 weight). 100% cotton yarn is highly recommended because it holds its shape beautifully, offers superior durability, and washes well.
-
Estimated Yardage: Approximately 25 g (59 yards / 54meters) for a standard 8.5 oz (250 ml) jar.
-
Hook Size: 4.0 mm (US G/6), or the size required to match your chosen yarn label.
-
Notions: Stitch marker, scissors, and a tapestry needle for weaving in loose ends.
Stitch Abbreviations
-
MR: Magic Ring
-
CH: Chain stitch
-
SC: Single crochet
-
DC: Double crochet
-
FPDC: Front post double crochet (worked around the vertical post of the stitch from the previous row rather than into the top loops)
-
FLO: Front loop only
-
SL ST: Slip stitch
-
INC: Increase (work two single crochets into the same stitch)
Step-by-Step Instructions
Part 1: Crafting the Circular Base
The base is worked in a continuous, seamless spiral (without joining each round with a slip stitch). Place your stitch marker in the first stitch of each round to keep your place.
Customization Tip: Continue the increase pattern below until the crocheted circle perfectly matches the bottom diameter of your glass jar. If your jar is small, you may stop after Round 7 or 9.
-
Round 1: Create a MR. Work 6 SC into the ring. Do not join. {6}
-
Round 2: Work an INC in every stitch around. {12}
-
Round 3: (1 SC, 1 INC) repeat 6 times. {18}
-
Round 4: 1 SC, 1 INC, (2 SC, 1 INC) repeat 5 times, 1 SC. {24}
-
Round 5: (3 SC, 1 INC) repeat 6 times. {30}
-
Round 6: 2 SC, 1 INC, (4 SC, 1 INC) repeat 5 times, 2 SC. {36}
-
Round 7: (5 SC, 1 INC) repeat 6 times. {42}
-
Round 8: 3 SC, 1 INC, (6 SC, 1 INC) repeat 5 times, 3 SC. {48}
-
Round 9: (7 SC, 1 INC) repeat 6 times. {54} (Typical size for standard small jars)
-
Round 10: 4 SC, 1 INC, (8 SC, 1 INC) repeat 5 times, 4 SC. {60}
(If a larger base is needed, continue adding 6 stitches per round, alternating even-numbered rounds to stagger the increases for a perfect circle up to Round 20).
Building the Lower Wall:
Once your base matches the bottom of the jar, you will build up a short wall to transition to the main body.
-
Rounds 1–2: SC in every stitch around to begin curling the work upward.
-
Round 3: SC in every stitch around, then SL ST into the first stitch of the next round to level the spiral and complete the base.
Part 2: The Textured Shell Body
For the main body, you will switch to joining each round with a slip stitch to keep the decorative shell pattern perfectly aligned.
Round 1 (Setting the Foundation):
-
-
CH 2 (counts as your first DC). Skip 2 stitches.
-
In the next stitch, work the “Shell”: (2 DC, CH 1, 2 DC).
-
Skip 2 stitches.
-
*1 DC in the next stitch, skip 2 stitches, work a Shell (2 DC, CH 1, 2 DC) in the next stitch, skip 2 stitches.* Repeat from * to * around.
-
SL ST into the top of the initial CH-2 to close the round.
-
Round 2 (Introducing the Post Stitches):
-
-
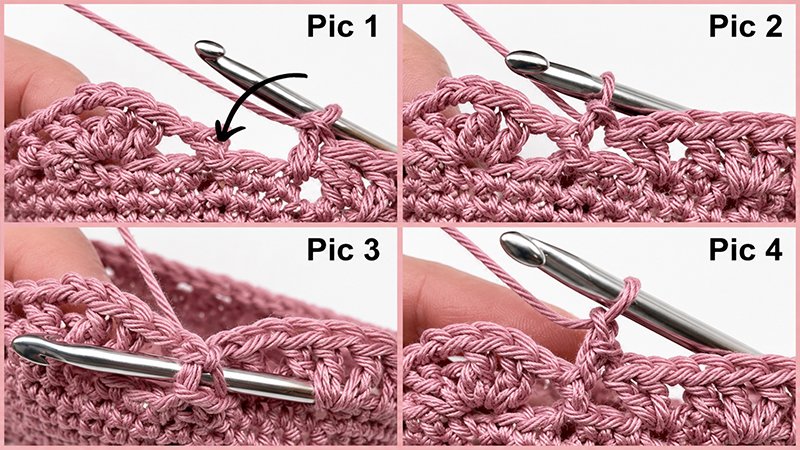
Insert your hook from front to back to front around the post of the joining chain from the previous round; work 1 SC and CH 1 (this serves as your first mock-FPDC). Alternative: You can simply CH 2 instead.
-
In the next CH-1 space (the center of the shell), work a new Shell: (2 DC, CH 1, 2 DC).
-
*Work 1 FPDC around the standalone DC from the previous row, then work a Shell (2 DC, CH 1, 2 DC) directly into the next CH-1 space.* Repeat from * to * around.
-
SL ST to the first stitch to join.
-
Round 3 & Onward:
-
-
Repeat Round 2. You will work FPDC stitches directly over previous FPDC stitches, and new shells into the centers of the previous rows’ shells.
-
Continue repeating this sequence until the sleeve reaches your desired height near the neck of the jar.
-
Part 3: The Cinch Rim
To ensure the cover fits snugly and doesn’t slip off the glass, the final round contracts slightly around the jar’s neck.
Final Round:
-
-
SL ST into the Front Loops Only (FLO) of each DC and CH-1 space across the top of the shells.
-
Completely skip over every FPDC stitch to draw the fabric inward.
-
Fasten off using an invisible join method. Cut the yarn, pull it through, and weave in all loose ends securely with your tapestry needle. Slide your finished cozy onto the jar!
-


