Pattern Description:
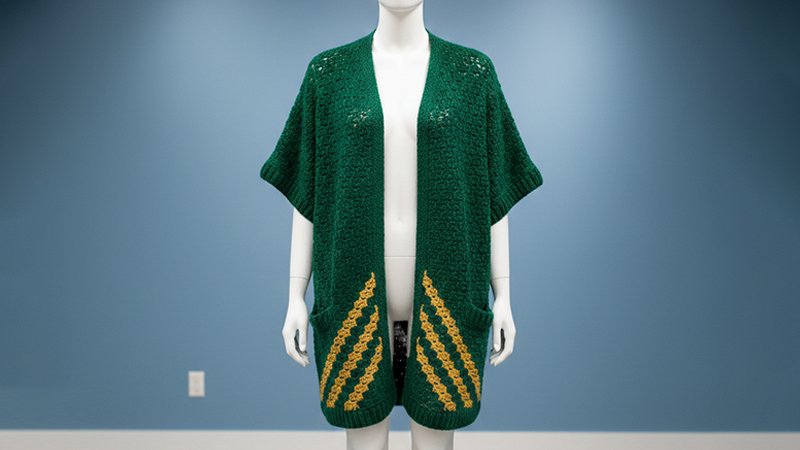
This simple corner-to-corner (C2C) kimono sweater is made from four basic C2C rectangles. It utilizes the speedy diagonal box stitch and soft, drapey yarn to create a comfortable, relaxed garment.
The C2C pattern’s natural bias effortlessly adds visual interest, forming diagonal stripes on the back while the front remains clean and pocketed. The pattern is deceptively easy and works up quickly.
Materials Needed & Measurements:
Sizes and Fit
The pattern includes three sizes: S/M, (L/XL, 2X/3X).
- Fits Bust: 32–38”, (40–46”, 48–54”).
- Finished Length: 27.5” (28.25”, 28.25”).
- Fit: The fit is intended to be oversized; crocheters should size down for a more fitted look.
Gauge
- Gauge: 2.75” = 4 tiles.
- Tile size: Each tile equals approximately .69”.
- Gauge Check: It is very important to ensure garment fit by making a C2C square with 6 tiles on each side, measuring the four middle tiles in each direction, and averaging the result.
Supplies
- Yarn: Lion Brand ZZ Twist (Weight: 4/medium – 246 yds, 3.5 oz).
- Main Color (Taupe #763-122): 8 (10, 10) skeins.
- Accent Color (Ecru #763-098): 1 (1, 1) skein.
- Hook: Size J (5.75 mm) crochet hook.
- Notions: Tapestry needle, Stitch markers or safety pins.
- Pattern Components: Graph patterns for C2C rectangles are needed, and written line-by-line C2C instructions are optional (available in the ad-free PDF).
- Kit Option: A crochet kit is available that includes all the required yarn and a printed copy of the pattern.
Abbreviations and Glossary (US Terms)
- bpdc – back post double crochet
- ch – chain
- dc – double crochet
- fpdc – front post double crochet
- PM – place marker
- rep – repeat
- RS – right side
- sp – space
- st(s) – stitch(es)
- sl st – slip stitch
- tch – turning chain
- tile – one c2c box in a graph (6 total chains + 3 double crochet)
- WS – wrong side
Instructions for Making the Simple C2C Crochet Kimono Pattern:
Make Main Kimono Pieces
The kimono is created from four basic C2C rectangles. Using a dc c2c st, follow the graphs to create one Left Back piece, one Right Back piece, and two Front pieces in the appropriate size. The first half of the rectangle involves increasing at the beginning of each row, adding one tile per row. Once the longest row is finished, each row begins by decreasing, which eliminates one tile and creates a flat edge.
Pockets
Using the main color yarn, make 2 c2c squares that measure 11×11 tiles. To reduce the number of ends to weave in, simply keep the yarn attached at the end of making the pocket square and move directly onto the Pocket Ribbing section.
Joining Kimono Pieces
- Seaming Back and Sides
- All vertical seams are worked from the bottom of the kimono upward.
- Lay the Left Back and Right Back pieces down so they form an arrow shape.
- Using a tapestry needle and a single strand of main color yarn, use the mattress stitch to join both pieces along the center back.
- Add an additional tapestry needle and strand of accent color yarn when the first accent color tiles are reached, using the appropriate color yarn to seam each section.
- The side facing you is now the WS.
- Continuing with the WS facing up and using the mattress stitch, seam a Front piece to the Left Back and Right Back.
- On each side, fasten off after 25 tiles have been seamed so that 15 (16, 17) tiles remain for the armhole.
- Seaming Shoulders With both WS facing out, seam the shoulders in the same fashion (mattress stitch), beginning at the outer shoulder and working toward the neck.
Sleeves
The sleeve is added by seamlessly adding an additional C2C rectangle to the armhole of the garment.
- Attach main color yarn near the armhole at the side seam.
- Row 1: Ch 6, dc in fourth ch from hook, dc in each of next 2 ch, sl st between first and second tiles along armhole (tile made). (1 tile).
- Row 2: Ch 3, sl st between second and third tiles, turn, ch 3, 3 dc in ch3sp (tile made), finish row by working 1 additional c2c tile; turn. (2 tiles).
- Row 3: Work a typical increase row of c2c tiles; at end of row: sl st in next sp between tiles along armhole edge.
- Row 4: Ch 3, sl st in next sp between tiles along armhole edge, turn, ch 3, 3 dc in ch3sp (tile made), finish row by working additional c2c tiles to end of row; turn.
- Rep Rows 3 and 4 until the additional rectangle is 6 (6, 7) tiles high. This is the corner, so decrease tiles must now be worked for all rows that begin at the end of the sleeve.
- Continue working in the pattern until c2c tiles encircle the armhole and you are back at Row 1.
- Work additional rows of c2c tiles, beginning with a decrease st for all rows now, until the rectangle is complete. Do not fasten off.
Ribbing
Ribbing is worked using post stitches and is the same for the bottom, front/collar, sleeves, and pockets. Ch 3 always counts as a dc.
- Row 1 Setup (All Ribbing):
- Place sts at the following intervals:
- 3 dc in each vertical tile (worked into 3 dc of C2C tile).
- 2 dc in each horizontal tile (worked under ch 3 of tile).
Sleeve Ribbing (Rows 1-4):
- Begin with RS of sleeve facing out.
- Row 1: Ch 3, dc across to opposite Sleeve corner using the frequency described above. Add one dc in the final tile if necessary to create an even number of total dc.
- Row 2 (WS): Ch 3, sk first dc, 1 fpdc around next dc, 1 bpdc around next dc; rep from to end of row, dc in top of tch; turn.
- Rows 3-4: Rep Row 2.
- Fasten off leaving a 20” tail for seams.
Bottom Ribbing (Rows 1-4):
- Attach yarn at the appropriate bottom corner and begin with RS facing.
- Row 1: Ch 3, dc across to opposite Front corner using the frequency described above.
- Rows 2-3: Rep Row 2 of Sleeve Ribbing.
- Row 4 (WS): Rep Row 2, but do not turn. Do not fasten off.
Collar Ribbing (Rows 1-4):
- With yarn still attached from bottom ribbing, work Row 1 up the front edge, around the neck, and down the opposite front edge (RS facing out).
- Row 1 (RS): Ch 3, 1 dc in first vertical row of bottom ribbing, 2 dc in each of next 3 vertical rows of bottom ribbing; dc around to the opposite Front corner using the frequency notes.
- Rows 2-4: Rep Row 2 of Sleeve Ribbing.
- Fasten off.
Finishing
- Sleeve Seam With WS of the garment facing out, use the tail from the sleeve ribbing and a tapestry needle to mattress stitch the underarm seam.
- Pockets With RS of the garment facing, pin the pockets to the Fronts. Ensure the RS of the ribbing faces out once folded over and pinned. Using the tail from pocket ribbing and a tapestry needle, whip stitch the pocket to the Front.