Pattern Description:
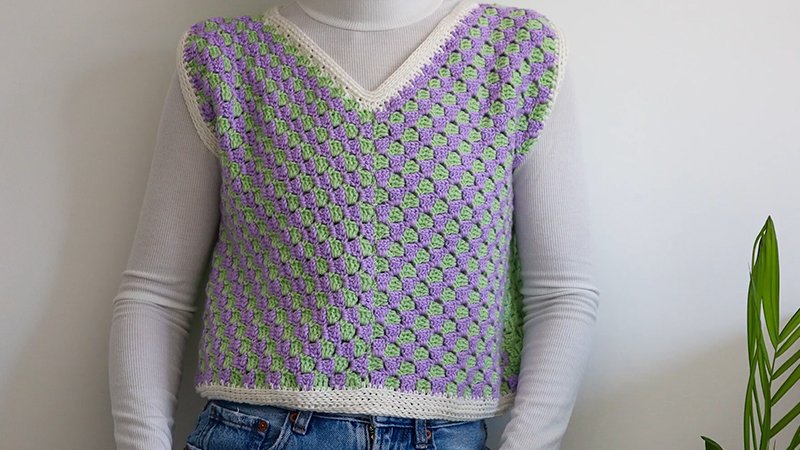
This pattern reates a Corner to Corner Vest using the c2c stitch, which utilizes 3 double crochet clusters or “blocks”.
It is constructed in three separate pieces (two fronts and a back) that are later seamed along the sides and shoulders.
The front panels are designed to form a V-neck opening. The vest can be made in one or two primary colors.
Materials Needed & Measurements:
Materials
- Yarn: Approximately 1000 yards (900m) of DK weight (3) yarn, such as Paintbox Yarns Simply DK.
- Note that you will need 15% more yarn for each size over S/M.
- If using two colors, divide the yardage in half for each color.
- If using one color for the back panel, you will need 3/4ths of the yardage in one color and 1/4th in the other color.
- A small amount of a 3rd color is optional for ribbing or edging.
- Hook: 4mm US G.
Gauge and Sizing
- C2C Gauge: A square sample of c2c that is 9×9 clusters will measure 5 inches (13cm) wide/tall.
- Finished Bust Measurements:
- S/M: 36 inches (91cm)
- L/XL: 42 inches (105cm)
- 2XL/3XL: 56 inches (142cm)
- Instructions Format: When pattern instructions differ for various sizes, the directions are written for the smallest size, with larger sizes listed in parenthesis.
Abbreviations Used:
- ch – chain
- dc – double crochet
- sl st – slip stitch
- sc – single crochet
- hdc – half double crochet
- inc – increase
- dec – decrease
- sts – stitches
- sp / ch-3 sp – space / chain-3 space
Instructions for Making the Corner to Corner Crochet Vest Pattern:
Front Panel Instructions (Make 2)
For the front panels, alternate colors (Color A and Color B) each row.
- Initial Increase Phase: Increase in c2c until your piece has 16 (18, 20) blocks along one side.
- Underarm Corner Decrease: On the next row, decrease (dec) at the end of the row. To execute the dec, slip stitch (sl st) into the last ch3 space, chain one (ch 1), and then sl st back along the 3 dcs of the block you just completed (this forms the underarm corner).
- Shaping for V-Neck and Armhole:
- S/M Size Only: Decrease (dec) at the end of the next row. Then, increase (inc) at the end of odd numbered rows and dec at the end of even numbered rows until you have 11 blocks above the underarm corner. Subsequently, dec at the end of each row until 11 blocks remain in the row. Fasten off.
- L/XL Size Only: Work 18 blocks. Decrease at the beginning of row 21 and inc at the end of row 21. Continue, inc at the end of odd numbered rows and dec at the end of even numbered rows until you have 13 blocks above the underarm corner. Then, dec at the end of each row until 11 blocks remain. Fasten off.
- 2X/3X Size Only: Continue increasing at the end of each row until the long side of your work has 27 blocks. Then, inc at the end of odd numbered rows and dec at the end of even numbered rows until you have 15 blocks above the underarm corner. Then, dec at the end of each row until 12 blocks remain in the row. Fasten off.
- Second Front Panel: Repeat the front panel instructions for the second panel, ensuring you start with the opposite color from the first panel.
Back Panel Instructions
The back panel is worked as a single piece. It should have double the number of blocks along the bottom edge compared to the front panel. The count for the underarm seam and arm hole blocks should remain the same as on the front panel. Continue decreasing to the other side of the work, as there is no V-neck shaping required for the back.
Assembly (Seaming)
First, seam the two front panels together up the middle, leaving the final rows unseamed to form the V-neck opening. Next, seam the back panel to the front panels along the sides and along the shoulders.
Finishing Off Raw Edges
To level the scalloped V-neck edge, attach a new yarn at one shoulder.
- Working Down to V-Neck Center: Heading towards the center point of the V-neck, work 1 dc, 1 hdc, 1 sc along the first block. Slip stitch (sl st) into the next ch3 space. Repeat this sequence (1 dc, 1 hdc, 1 sc, and sl st into next ch 3 sp) to level off the scalloped edge.
- Working Up Opposite Side: When you reach the center two blocks and begin working up the opposite side, reverse the stitches: work 1 sc, 1 hdc, 1 dc and sl st. Repeat the sequence 1 sc, 1 hdc, 1 dc, sl st to even out the c2c edge on the other side.
Adding Ribbing
Ribbing of your choice can be added along the bottom edge, sleeve openings, and neckline.
- When adding stitches (sts) along the c2c edges (for sleeve openings and neckline), alternate 3 sts and 2 sts along the edge of each c2c block.
- On the bottom edge, work 2 sts for each block for a more “sinched in” look.