Pattern Description:
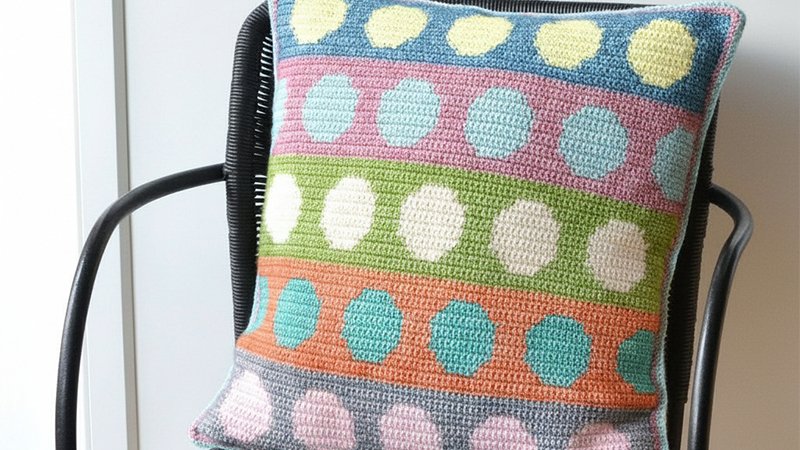
This free crochet pattern creates a reversible pillow cover composed of two joined squares fastened with a zip.
The front features a vivid circles design worked using the tapestry crochet technique, while the back consists of simple stripes made with single crochet stitches.
This pattern is rated Intermediate, although advanced beginners are encouraged to try the technique.
Materials Needed & Measurements:
Materials Needed
- Yarn in 10 shades. The designer used Stone Washed by Scheepjes.
- Specific shades used were: 802, 820, 816, 815, 806, 817, 808, 813, 805, and 801.
- One skein of each shade is required, though you may create your own color combination.
- Crochet Hook: Clover Soft Touch 3.25mm.
- One zip: 30cm.
- Scissors and a tapestry needle to weave in the yarn tails.
- Measurements
- Finished Measurements: The finished pillow cover measures approximately 44cm x 44cm (17 ½” x 17 ½”).
- Gauge The gauge for the front and back pieces differs slightly because of the additional yarn carried through the front section.
- Front Gauge: 20 sts x 21 rows = 10cm x 10cm (4” x 4”).
- Back Gauge: 19 sts x 21 rows = 10cm x 10cm (4” x 4”).
Abbreviations Used:
- rnd(s) – round(s)
- st(s) – stitch(es)
- ch – chain
- sl st (slip stitch) – insert hook in indicated st, yo, draw yarn up and pull 2nd lp through the 1st lp on hook.
- sc (single crochet) – insert hook in indicated stitch, yo, draw up a lp, yo and pull through both lps on hook.
- NJ – needle join
- … – crochet following directions as many times as indicated
Instructions for Making the Tapestry Circles Pillow Pattern:
Front (Tapestry Crochet)
The front part uses the tapestry crochet technique with a circles pattern. Each repeat in the pattern is 16 sts + 5 sts for symmetry. The instructions provided use 5 repeats.
Important Notes:
- Ch1 at the beginning of every row does not count as sc. The first sc of every row is made in the first sc of the previous row.
- Change color on the last yarn-over of the last sc of the relevant row.
Color Setup: Use 10 shades of yarn; the instructions here specify shades 802, 820, 816, 815, 806, 817, 808, 813, 805, and 801.
Color DesignationsShadeC1, C2 (Stripe 1)802 (C1), 820 (C2)C3, C4 (Stripe 2)816 (C3), 815 (C4)C1, C2 (Stripe 3)806 (C1), 801 (C2)C3, C4 (Stripe 4)808 (C3), 813 (C4)C1, C2 (Stripe 5)805 (C1), 817 (C2)
Stripe 1 (Shades 802 and 820):
- Row 1: Ch86 with 802 (C1). Starting in 2nd ch from hook, sc in every ch to the end. (85sc). Turn.
- Rows 2–3: Ch1, 85sc. Turn.
- Row 4: Start working with 802 (C1) and 820 (C2). Ch1, 8sc with C1 (change yarn on 8th sc), 5sc with C2 (change yarn on 5th sc), 3sc with C1 5 times, 5sc with C1. Turn.
- Row 5: Сh1, 7sc with C1, 5sc with C2, 2sc with C1 5 times, 5sc with C1. Turn.
- Row 6: Сh1, 6sc with C1, 9sc with C2, 1sc with C1 5 times, 5sc with C1. Turn.
- Rows 7–12: Сh1, 5sc with C1, 11sc with C2 5 times, 5sc with C1. Turn.
- Row 13: As row 6.
- Row 14: As row 5.
- Row 15: As row 4. Cut C2 leaving a 15cm (6”) tail.
- Rows 16–18: With C1 as row 2. Change to 816 (C3). Cut C1 leaving a 15 cm (6”) tail.
Stripe 2 (Shades 816 and 815):
- Rows 19–21: With C3. As row 2.
- Row 22: Ch1, 5sc with C4, 11sc with C3 5 times, 5sc with C4. Turn.
- Row 23: Ch1, 6sc with C4, 9sc with C3, 1sc with C4 5 times, 5sc with C4. Turn.
- Row 24: Ch1, 7sc with C4, 7sc with C3, 2sc with C4 5 times, 5sc with C4. Turn.
- Rows 25–30: Ch1, 8sc with C4, 5sc with C3, 3sc with C4 5 times, 5sc with C4. Turn.
- Row 31: As row 24.
- Row 32: As row 23.
- Row 33: As row 22. Cut C4 leaving a 15cm (6”) tail.
- Rows 34-36: With C3 as row 2. Change to 806. Cut C1 (referring to 816/C3) leaving a 15 cm (6”) tail.
Remaining Stripes:
- Rows 37-54: Repeat rows 1-18 working with shades 806 (C1) and 801 (C2).
- Rows 55-72: Repeat rows 19-36 working with shades 808 (C3) and 813 (C4).
- Rows 73-90: Repeat rows 1-19 working with shades 805 (C1) and 817 (C2). (After row 90 you should have a square shape).
Squaring the Front:
After row 90, change to shade 808 and crochet around the entire square. Make 85sc on each side and 3sc in each corner. For even, neat work on the sides, make 17sc into every stripe.
Finish with a sl st in the 1st sc of this rnd or with a NJ in the 2nd sc. Cut yarn and weave all tails in.
Back (Simple Stripes and Border)
The back is designed with simple stripes, later squared up with a striped border.
- Row 1: Ch75 with 802. Starting in 2nd ch from hook, sc in every ch to the end. (75sc). Turn.
- Rows 2–90: Ch1, 75sc. Turn.
Color Way (Rows 1-90):
- Rows 1-9: Shade 802
- Rows 10-18: Shade 820
- Rows 19-27: Shade 815
- Rows 28-36: Shade 816
- Rows 37-45: Shade 806
- Rows 46-54: Shade 808
- Rows 55-63: Shade 817
- Rows 64-72: Shade 813
- Rows 73-81: Shade 801
- Rows 82-90: Shade 805
(Note: After Row 90, the back is approximately 40cm x 39 cm (16” x 15 ½”).)
Squaring the Back (To Match Front Count):
Change yarn to shade 808 after row 90.
- Rnd 1: 75sc on the top, 3sc in the corner, turn quarter and work 75sc on the next side (make 7sc and 8sc in every other stripe), 3sc in the next corner, 75 sc on the bottom, 3sc in the corner, 75sc on the next side (same as previous), 3sc in the corner. Join with sl st in 1st sc of the rnd. Mark the central sc in every corner.
- Rnd 2: Ch1 (not a st), sc in the same st. Continue crocheting around the square and make 3sc in every marked st in the corner. Join either with sl st in 1st sc after ch1, or with NJ into 2nd st after ch1. Fasten off (77sc on each side + 3sc in every corner).
- Rnds 3-4: Join shade 815 in any st after the central st in the corner and sc around, making 3sc in the central st in each corner. Join as on rnd 2. Fasten off (After rnd 4 you’ll have 81 sc on each side + 3 sc in every corner).
- Rnds 5-6: With shade 817 repeat rnds 3 and 4 (After rnd 6 you’ll have 85 sc on each side + 3 sc in every corner, matching the front count).
Joining
Place the front and back pieces with wrong sides facing. You will crochet the joining row on the back piece.
- With shade 813, start joining both parts on the bottom approximately 5cm (2”) before the corner.
- Crucially, find the central sc in the corner on both front and back to ensure you begin joining in the right st.
- Crochet with sc until the 1st corner (insert the hook under all 4 loops).
- Continue crocheting along the 3 next sides, and make the same amount of sc on the other edge of the bottom as you did in the beginning.
- Do not fasten off, and continue to sc on the back only.
- When you come to the beginning of the joining row, cut yarn leaving approximately 50cm (20”) tail and NJ in 1st sc of the joining row.
- Now, sc along the unworked part of the zip opening (on the wrong side of the Front part).
- When you come to the beginning of the joining row, cut yarn leaving an approximately 50cm (20”) tail and finish with NJ to the beginning of the joining row.
Inserting Zip
You will use the 30cm zip.
- Pin the zip to the opening on the bottom of the cover using a few sewing pins.
- Sew the zip along the opening using the yarn tails and running stitch.
- Secure the tails and cut the yarn.
You’ve created your Tapestry Circles Pillow cover!