Pattern Description:
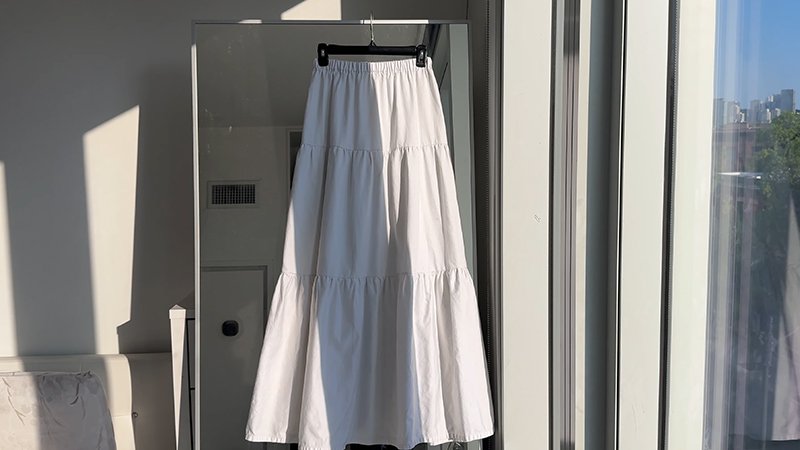
This is an easy, no-pattern, beginner-friendly tiered skirt constructed from three gathered fabric rectangles.
Each successive tier is calculated to be 1.5 times wider than the tier above it, creating a beautiful flowy, cinched-in silhouette.
The pattern requires simple math based on your personal waist/hip and length measurements. The top tier incorporates a casing for elastic.
Materials Needed & Measurements:
Materials Needed:
- Fabric: The specific fabric used was 100% rayon, 58 inches wide, and required 2.5 yards (approximately 96 inches long).
- Elastic: Elastic that is 1 1/2 inches wide is used for the waistband casing.
- Tools for Seam Finishing: Options include pinking shears, zigzag stitch on a sewing machine, or a serger.
- Tools for Casing: A bodkin or a safety pin is needed to feed the elastic through the casing.
- Other Tools: A calculator is recommended for the initial measurements.
Measurements & Calculations:
The pattern is based on individual measurements. Before cutting, you must determine your waist or hip measurement (where the skirt will sit) and the desired length of the skirt (e.g., from waist to feet).
1. Calculating Tier Widths (Width of Rectangles):
The width of each tier is determined by multiplying the measurement above it by 1.5.
| Tier | Calculation | Example (using 54-inch waist) |
| Tier 1 Width | Waist/Hip Measurement $\times$ 1.5 | 54 in $\times$ 1.5 = 81 inches |
| Tier 2 Width | Tier 1 Width $\times$ 1.5 | 81 in $\times$ 1.5 = 121.5 inches |
| Tier 3 Width | Tier 2 Width $\times$ 1.5 | 121.5 in $\times$ 1.5 = 182.25 inches |
2. Calculating Number of Fabric Pieces:
Once the total required width for each tier is determined, you must divide that width by your fabric width (or width of fabric, WOF) to find how many rectangles to cut.
- Tier 1: Example required 81 inches total width, so the fabric was divided by 2, resulting in two 40-inch lengths.
- Tier 2: Example required 121.5 inches total width, resulting in two 58-inch (WOF) pieces.
- Tier 3: Example required 182.25 inches total width, resulting in three 58-inch (WOF) pieces.
3. Calculating Tier Heights (Length of Rectangles):
The total skirt length (e.g., 40 inches) is divided among the three tiers, remembering to include seam allowances (a smidge, perhaps an inch total). The top tier needs extra length for the elastic casing.
- Tier 1 Height: Needs approximately 2 inches extra to cover the 1 1/2 inch elastic casing. The example uses 15 inches.
- Tier 2 Height: The example uses 13 inches.
- Tier 3 Height: The example uses 13 inches.
Note on Flexibility: The measurements do not have to be exact because the tiers are gathered, giving you wiggle room. Fabric can be “ripped” along the grain line for accurate measurements instead of using measuring tape, especially with flimsy fabrics like rayon.
Instructions for Making the Tiered Skirt Pattern:
Preparation and Cutting Fabric
- Square Up and Rip Fabric: Before measuring and cutting, square up your fabric. Because flowy fabrics like rayon are flimsy, the most accurate way to measure is often by ripping the fabric along the grain line instead of using measuring tape. To rip, make a snip past the salvage and tear down; the fabric will rip along the exact string of the grain line.
- Cut Tier 1 Pieces: Based on your calculations (e.g., 15 inches tall), measure the height of your Tier 1 piece. Rip or cut two rectangles (e.g., 15 inches long each).
- Cut Tier 2 and Tier 3 Pieces: Use your calculated heights (e.g., 13 inches tall) and cut the remaining five pieces required for Tiers 2 and 3.
- Press Fabric: Iron or press all your cut pieces.
- Organize: It is helpful to organize and label your piles (e.g., Tier 1, Tier 2, Tier 3) and place them in the order you plan to sew them.
Assembling the Tiers (Creating Circles)
- Start with Tier 1: Grab the two Tier 1 pieces. Connect them at the short ends to form a circle.
- Seam and Stitch: Place the right sides (or pretty sides) touching. If salvages are still present, sew right alongside the line of the salvage to cover it up, or cut the salvage off and sew a 1/2 inch or 1/4 inch seam.
- Stitch Settings: Set your stitch length to 2.5 and start with a backstitch, stitching along the edge, and backstitch at the end.
- Repeat for All Tiers: Repeat this process for Tier 2 and Tier 3, connecting all their short ends to create three full circles.
Finishing Seams and Edges
Secure your seams to prevent the fabric from fraying. Choose one of the following methods for the seams created in Step II:
- Pinking Shears: Cut right up along the seam edge, leaving about a quarter inch. (Note: This is an acceptable, quick option but less secure).
- Zigzag Stitch: Use a zigzag stitch, lining the notch in the middle of your presser foot up with the raw edge so that one stitch goes into the fabric and one goes out.
- Serger: Use a serger, which wraps thread around the edge to create a secure seam finish. You can either sew the seam first and then finish with the serger, or sew the entire seam using the serger itself.
- Finish Top Edge: Serge, zigzag, or pink shear the top edge of Tier 1 now to secure it, as rayon frays easily.
Gathering and Attaching Tiers
You will work from top to bottom (attaching Tier 2 to Tier 1, then Tier 3 to Tier 2).
- Set Up Gathering Stitch: Switch your sewing machine to a basting stitch by increasing the stitch length to five.
- Sew First Gathering Row (Tier 2): Stitch a row about 1/4 inch away from the edge of Tier 2. Do not start on a seam and do not backstitch. Sew about five inches past where you started, raise the needle, pull the fabric out, and leave a nice long tail.
- Sew Second Gathering Row (Tier 2): Load the piece back in and sew a second row of stitches about 1/8 inch away from the first row. Again, leave a long tail.
- Gather the Fabric (Tier 2): Find the two long tails, wrap them around your fingers, and gently pull to scrunch up the fabric. Pulling on the diagonal (about 2 inches down) can help the rayon move nicely.
- Adjust Gathers: Pull the gathers tightly initially, and then lay Tier 2 against Tier 1. Ease the gathers out along the thread so that Tier 2 matches the width of Tier 1. Try to keep the gathers as even as possible.
- Pin/Clip Tiers: Match the side seams of Tier 1 and Tier 2. Pin or clip the gathered raw edge of Tier 2 to the raw edge of Tier 1.
- Attach Tiers: Switch the stitch length back to 2.5. Load the fabric with the gathers side up so you can adjust them as you sew. Sew at about a 1/2 inch seam allowance, ensuring the stitch is to the left of your gathering stitches. Sew slowly, ensuring the gathers are facing down and not sideways.
- Finish Seam: After attaching, finish the new seam allowance using your preferred method (serger, zigzag, or pinking shears).
Gathering and Attaching Tier 3
- Gather Tier 3 (Cheat Method): Use the machine setting of five. Sew about 8 to 10 stitches. Then, reach up and grab the thread coming from the spool (the top thread). Apply a tiny bit of pressure to this thread while guiding the fabric. The fabric will gather automatically.
- Adjust and Attach: Leave a long tail. Adjust the Tier 3 gathers to match the width of Tier 2. Clip and attach Tier 3 to Tier 2 using the same method as Step IV, ensuring the side seams are matched up as closely as possible. Finish this seam.
Creating the Waist Casing and Inserting Elastic
- Determine Casing Size: The elastic used is 1 1/2 inches wide. The casing must be larger than the elastic.
- Fold Casing: At the top edge of Tier 1, fold the fabric down about 1 3/4 inches. Press this fold around the entire circumference.
- Stitch Casing: Set the machine back to 2.5. Lay the casing under the needle and sew a straight stitch about 1/8 inch up from the fold, going all the way around. Leave a 3 to 4 inch opening (hole) near the seam for threading the elastic.
- Thread Elastic: Use a bodkin or a safety pin to grip the elastic and feed it through the casing hole.
- Secure Elastic: Pin the starting end of the elastic to the fabric near the opening to prevent losing it inside the casing.
- Join Elastic Ends: Once threaded, ensure the elastic is not twisted. Overlap the two elastic ends by about 1 inch. Switch to a zigzag stitch and sew across the overlapped section multiple times to securely join the ends.
Finishing the Skirt
- Close Casing Hole: Switch back to a straight stitch and close the 3-4 inch hole in the casing.
- Prevent Rolling Elastic: To keep the elastic from rolling, stretch the skirt to evenly distribute the fabric and elastic. Then, stitch in the ditch (right along the seam line at the side seams or quarter points) to lock the elastic into place.
- Hem the Bottom: Choose your preferred hemming method. If happy with the skirt length, perform a quarter-inch hem.
- Double Fold Hem: Fold the bottom edge down a quarter inch, and then over again.
- Quilting Foot Method: Use a quarter-inch hem foot with a guide to automatically feed the fabric at a 1/4 inch mark. Start and end with a backstitch.
Once finished, your adorable, flowy tiered skirt is ready to wear.