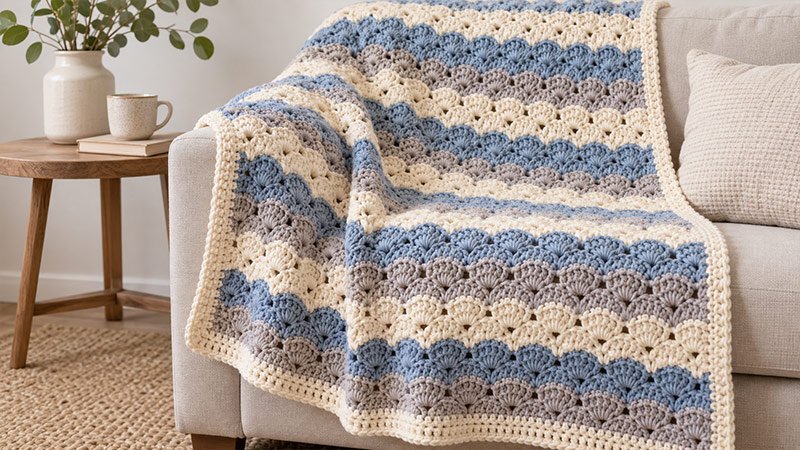
The Shell Stitch Crochet Blanket has soft rows of curved shells. Each shell is made with a group of double crochet stitches. Single crochet stitches sit between the shells. This makes a neat pattern with a soft feel.
The blanket is worked back and forth in rows. The row repeat is short and easy to learn. Once you know the repeat, you can keep going until the blanket is long enough.
Add a simple single crochet border when the main part is done. The border helps keep the edges neat.
You can use one yarn color for the whole blanket. You can also change colors after a few rows to make stripes.
This pattern uses worsted-weight yarn. It makes a soft throw that you can use on a sofa, chair, or bed.
Skill Level: Easy to Intermediate
Finished Size: About 42 inches wide × 54 inches long, with the border
Construction: Worked flat from the bottom up
Stitch Pattern: Shell stitch
Crochet Terms: US terms
Important: This is an original pattern. It has not been tested with a sample blanket. The size and yarn amounts are estimates. Make a small gauge swatch before you start the full blanket.
Materials
- Worsted-weight yarn, Category #4: approximately 1,800–2,100 yards
- US H/8 (5 mm) crochet hook, or size needed to meet gauge
- Scissors
- Yarn needle
- Stitch markers, optional
- Measuring tape
Suggested Color Plan
For a simple striped blanket, divide the yarn between three colors:
- Color A: Cream — about 800 yards
- Color B: Soft blue — about 650 yards
- Color C: Light gray — about 650 yards
You can also work the entire blanket in one color.
Gauge
Approximately:
- 3 shell repeats = 4 inches wide
- 8 rows = 4 inches
Gauge does not need to be exact for a blanket, but it will affect the finished size and the amount of yarn required.
Crochet Pattern Notes
- This pattern uses US crochet terms.
- Turn your work after each row.
- The first ch 3 counts as 1 dc when noted.
- To make a shell, work 5 dc in the same st.
- Do not pull your sts too tight. This helps each shell sit flat.
- The stitch count is a multiple of 6 + 2.
- To change the width, add or take away chs in sets of 6.
- Work a few rows, then check the width.
- If you use more than one color, change yarn at the end of a row.
- Weave in all loose ends before you add the border.
Abbreviations
ch — chain
dc — double crochet
sc — single crochet
sk — skip
sl st — slip stitch
st — stitch
sts — stitches
sp — space
rep — repeat
RS — right side
WS — wrong side
rnd — round
Special Stitch
Shell: Work 5 dc in the indicated st.
Pattern Instructions
Starting Chain
Using Color A:
Ch 158.
The foundation chain follows the multiple of 6 + 2 used for this blanket.
Try not to make the starting chain too tight. If needed, use a hook one size larger for the chain, then return to the main hook.
Row 1
- Sc in the 2nd ch from hook.
- Sk next 2 ch, work 5 dc in next ch, sk next 2 ch, sc in next ch.
- Rep from * to * across.
Turn.
You should now see a row of curved shell groups separated by sc sts.
Row 2
- Ch 3.
- Work 2 dc in the first sc.
- Sc in the center dc of the next shell, 5 dc in the next sc.
- Rep from * to * across until the final shell.
- Sc in the center dc of the final shell.
- Work 3 dc in the last sc.
Turn.
The half-shells at the beginning and end help keep the sides balanced.
Row 3
- Ch 1.
- Sc in the first dc.
- Work 5 dc in the next sc, sc in the center dc of the next shell.
- Rep from * to * across.
- End with sc in the top of the turning ch.
Turn.
Row 4
- Ch 3.
- Work 2 dc in the first sc.
- Sc in the center dc of the next shell, work 5 dc in the next sc.
- Rep from * to * across.
- Finish with sc in the center dc of the last shell, then work 3 dc in the final sc.
Turn.
Continue the Main Blanket
Repeat Rows 3–4 until the blanket measures about 52 inches long, or until you reach your preferred length.
Do not fasten off if you are using the same color for the border.
If you are using a different border color, fasten off and join the new yarn in any corner
Optional Stripe Sequence
If you want a striped blanket, try this simple sequence:
Rows 1–8: Color A
Rows 9–16: Color B
Rows 17–24: Color C
Continue repeating these three color sections until the blanket reaches the desired length.
You can make wider or narrower stripes by changing the number of rows worked in each color.
When changing colors, complete the final yarn-over of the last stitch with the new color. Cut the old yarn, leaving a tail long enough to weave in securely.
Border
The shell pattern can create slightly uneven side edges. The first border round helps straighten them before adding the remaining rounds.
Border Round 1
Join Color A in any corner.
- Ch 1.
- Work sc evenly around the entire blanket.
- Along the top and bottom, work approximately 1 sc in each st.
- Along the sides, place the sc sts evenly between the row ends. Avoid adding too many stitches because this can make the border ripple.
- Work 3 sc in each corner.
Join with a sl st to the first sc.
Border Round 2
- Ch 1.
- Sc in each st around.
- Work 3 sc in the center corner st at each corner.
- Join with a sl st to the first sc.
Border Round 3
Repeat Border Round 2.
For a wider frame, repeat the same round one or two more times.
Fasten off after the final round.
Finishing
Cut the yarn. Leave a tail a few inches long.
Use a yarn needle to hide all loose ends. Weave each end into the back of the stitches. Weave it in two or more ways so it stays in place.
Lay the blanket flat. Gently shape the sides and corners with your hands.
You can lightly wet block the blanket if the yarn is safe to block. This can help the shells sit flat and look even.
Always check the yarn care label before you block the blanket.
Changing the Blanket Size
The starting chain uses a multiple of 6 + 2.
To make the blanket wider, add chains in groups of 6.
To make it narrower, remove chains in groups of 6.
For example, you can make a smaller lap blanket by reducing the starting chain and stopping at a shorter length. For a larger bed blanket, increase the starting chain and continue the row repeat until the required length is reached.
Remember that changing the dimensions will also change the amount of yarn needed.
Helpful Tips
- Count the shell groups now and then. Make sure none are missed.
- Work each sc into the center dc of the shell when told. This keeps the next row even.
- Check the first and last st of each row. A missed edge st can make the blanket too narrow.
- If the fabric feels too firm, use a larger hook.
- If the shells feel too loose, use a smaller hook.
- Make a small test piece before you start the blanket.
- Work a few shell repeats in the test piece.
- Measure the test piece. Then wash it as the yarn label says.
- Check it again after it is dry. This will help you plan the size of your blanket.
Care
Follow the washing and drying directions printed on your yarn label.
For most washable worsted-weight yarns, gentle washing and low-temperature drying may be suitable. Do not assume all yarn can be cared for in the same way.
After washing, reshape the blanket while damp if needed and allow it to dry completely before storing.
I can also adapt this into a baby blanket, 50 × 60-inch throw, or queen-size version with recalculated starting chains and yarn estimates.