Pattern Description:
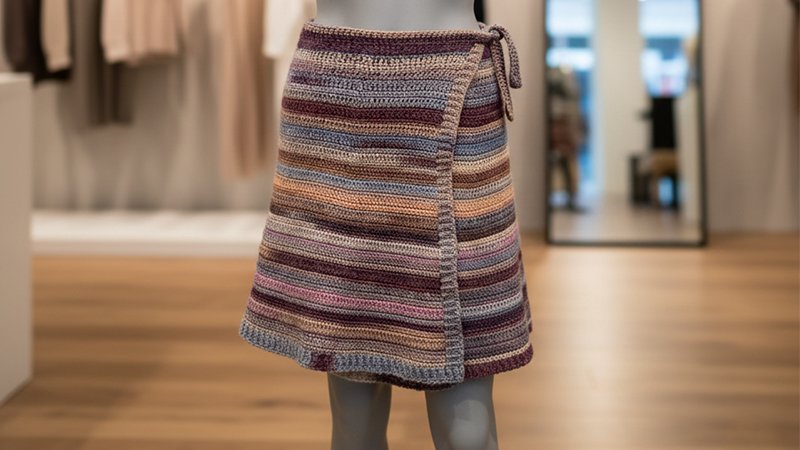
This top-down crochet Wickelrock wrap skirt begins with a long foundation row that forms both the strap and waistband.
The A-line body is shaped with eight evenly spaced increases every third row, allowing full customization.
Finished with a textured bottom band, side edging, two straps, and a button closure, the design adapts easily to any waist, yarn weight, or skirt length.
Materials Needed & Measurements:
Yarn & Hook
- Yarn: Gomitolo Molto by Lana Grossa, color 610 (or any yarn; adjust yardage if changing weight)
- Amount (Size 40): ~285 g / 1000 m (≈1094 yards)
- Hook: 4.5 mm or size needed for gauge
Gauge
- 19 sts × 16 rows = 10 × 10 cm in stitch pattern (starting with a dc row)
Notions
- Scissors
- Yarn needle
- 8 stitch markers
- 15 mm button (must fit through one row of dc)
- Tape measure
- Sewing needle & matching thread
Key Measurement for Start Length
- Waist circumference + 1/3 of waist for overlap + 20 cm (8 in) for strap
- Example: 90 cm waist → 90 + 30 + 20 = 140 cm starting length
Abbreviations Used:
- st / sts – stitch / stitches
- sl st – slip stitch
- fsc – foundation single crochet
- ch – chain
- sc – single crochet
- dc – double crochet
- blo – back loop only
Instructions for Making the Wickelrock Pattern:
Part 1: Strap and Waistband
The Wickelrock begins with a long foundation row that forms both the waistband and the first strap. Determine the starting length by measuring your waist (high or low) and applying the formula:
Waist circumference + 1/3 waist for overlap + 20 cm / 8 in for strap. Example: 90 cm + 30 cm + 20 cm = 140 cm.
- Row 1: fsc Foundation: Work fsc until the calculated length is reached. This creates a flexible, comfortable edge that forms the entire strap and waistband in one piece. Turn.
- Row 2: dc Row: Work dc across each st. This row creates height and stability for the waistband. Turn.
- Row 3: sc Row: Work sc across each st. This completes the basic waistband structure and prepares the foundation for the main A-line body. Turn.
Part 2: Main Body of the Skirt
The skirt body is worked top down, building width with eight evenly spaced increases in every third row. Before beginning increases, mark the point where the main body begins.
Establish Body Width
Work Row 4 in sc until the stitch count that matches your intended starting width (example: 162 sts). Place a marker in the last worked st. Turn.
Place Increase Markers
Divide the row into nine equal segments, placing 8 st markers to mark increase points. Example: For 162 sts → 18 sts per segment → markers placed every 18 sts.
Increase Pattern Repeat
The skirt grows through a repeating three-row sequence:
- Row 5: Increase Row (dc)”: Work dc in each st up to the first marker. At each marker:
- Work 2 dc in marked st,
- Move the marker to the 2nd dc of the increase.
- Repeat this process at all 8 markers. Continue dc to end of row. Turn. Stitch count increases by 8 sts each repeat.
- Row 6: sc Across: Work sc in each st. Move markers up into the corresponding sts as needed; do not increase. Turn.
- Row 7: sc Across: Work sc in each st again. No increases. Turn.
- Repeat Rows 5-7: Continue working the 3-row repeat until the skirt reaches the desired length. The final row of the main part must end on the side without the strap, as this sets up the bottom edging.
Part 3: Bottom Band and Side Band
This section creates the textured, ribbed finish on the lower edge and along the side of the skirt.
Bottom Band Construction
Ch 5. Row A: sc in 2nd ch from hook and next 3 ch (4 sc). Attach the band to the skirt as follows:
Repeat the following sequence:
(sl st in next 2 sts of main body, turn; sc blo in next 3 sts of band, sc through both loops in last st; ch1, turn; sc through both loops of first st, sc blo in next 3 sts, ch1, turn).
Work this attachment repeat all along the bottom edge. If one unworked st remains, sl st into it. If none remain, sl st into last st again for a clean corner.
Work 2 additional short rows at the end to square off the band edge.
Side Band Construction
Work 4 sc across the width of the bottom band to begin the side edging.
Repeat the following up the side of the skirt:
(sl st into next 2 rows of main body; turn; sc blo in next 3 sts, sc through both loops in last st; ch1, turn; sc through both loops of first st, sc blo in next 3 sts).
Continue until reaching the strap corner. Join the side band to the strap with 4 sl sts.
Part 4: Finishing the Strap and Waistband
Work sc along the edge of the strap and waistband. Place (sc, ch, sc) in each corner to maintain shaping. Work evenly across all three strap edges. Fasten off and weave in ends.
Part 5: Second Strap and Final Assembly
Count the sts of the first strap. Work fsc, then repeat Rows 2-3 using the same stitch count. Edge three sides of the second strap as in Part 4.
Block skirt. Sew button into corner without the strap. Try on skirt to determine placement of the second strap; sew securely.