Pattern Description:
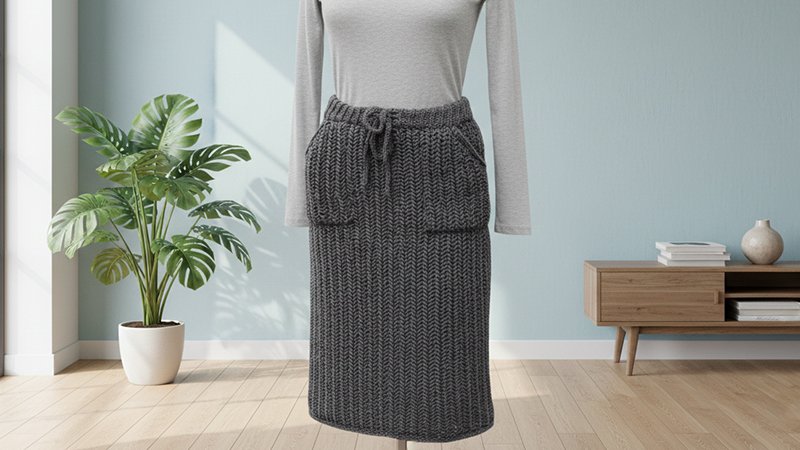
The hobble skirt crochet pattern creates a stretchy, pencil-style skirt inspired by vintage silhouettes.
Worked perpendicular with Herringbone Single Crochet and slip-stitch ribbing, it shapes a snug fit with slight negative ease.
Panels build the body, pockets add detail, and a fold-over waistband with cord holes finishes the look.
Suitable for sizes S-5XL using worsted yarn and basic tools for assembly and finishing the skirt.
Materials Needed & Measurements:
Materials Needed
| Item | Details |
| Yarn | Category 4 (worsted, aran). Specifically, the designer used Concept Sweet Fleece by Katia Yarns (80% wool, 20% Polyamide, 50 grams/approx. 120 meters) in Dark Grey. |
| Crochet Hook | 8 mm. |
| Tools | Yarn needle (for weaving in ends and assembling), scissors, and stitch markers. |
| Yarn Requirements | For balls of 50 grams/120 meters of Concept Sweet Fleece, the approximate amounts needed are: S (7), M (7), L (8), XL (9), 2XL (10), 3XL (10), 4XL (11), 5XL (12). |
Measurements
The written instructions cover women’s sizes from Small up to 5X Large. The skirt is designed with a closer fit and has a negative ease of about 4 cm around the hips circumference.
| Measurement | S (cm) | M (cm) | L (cm) | XL (cm) | 2XL (cm) | 3XL (cm) | 4XL (cm) | 5XL (cm) |
| Length c | 60 | 60 | 60 | 60 | 60 | 60 | 60 | 60 |
| Waist Width a | 34 | 39 | 42 | 47 | 50 | 55 | 58 | 62 |
| Hips Width b | 43 | 49 | 53 | 59 | 63 | 69 | 73 | 79 |
| Pocket Length d | 17 | 17 | 17 | 17 | 17 | 17 | 17 | 17 |
| Pocket Width e | 14 | 14 | 14 | 14 | 14 | 14 | 14 | 14 |
Tension (Gauge)
- 16 stitches (sts) = 10 cm
- 10 rows = 10 cm (These measurements are taken in the specific stitch pattern used).
Abbreviations Used:
- Ch – chain
- Ss – slip stitch
- Ss blo – slip stitch in the back loop only
- St(s) – stitch(es)
- YO – yarn over
- Hsc – Herringbone Single Crochet
- RS – right side
- WR – wrong side
- Dec 1 – Decrease 1 st: insert the hook into the last loop of the last made st, then into the next st, YO pull out a loop, insert the hook into the next st, YO and pull out a loop. YO and pass it through all 4 loop on your hook.
- Dec 2 – decrease 2 sts: Make 2 Dec 1
- R| – row
- ** – Repeated section
Instructions for Making the Hobble Skirt Pattern:
Slip Stitch in back loop only (Ss blo)
Insert the hook into the back loop of the next available st, YO pull out a loop, then pull the loop through the loop on your hook.
Herringbone Single Crochet (Hsc)
The first R| is worked into the 3rd loop of the Ch.
- Row 1 (RS): 1 sc in the first st. Insert the hook into the last loop of the previous sc just made, then insert the hook into the next st, YO and pull out a loop, YO and pull the yarn through all loops on your hook. Repeat to the end of the R|.
- Row 2 (WR): All sts on the WR R| are worked from back to front. Insert the hook into the first st, from back to front, YO and pull out a loop, YO and pull the yarn through all loops on your hook (this forms the first single crochet made from back to front).
*Insert the hook into the last loop of the previous single crochet (it’s on the back of your work), then insert the hook into the next st, from back to front, YO and pull out a loop, YO and pull it through all loops on your hook. Repeat to the end of the R|.
Back Panel
The total number of sts includes 16 sts that represent the waist band ribbing.
- Start| Ch 107 sts.
- R1| RS working in the back loop of the Ch: Starting with the second Ch, 1 sc in 1st st, 1 hsc in each of the next 90 sts, 1 ss into last 16 sts.
- R2| WS: 1 ssblo in first 16 sts, 1 hsc in each st to the end of the R|.
- R3| RS: 1 sc in 1st st, 1 hsc in each of the next 90 sts, 1 ssblo into last 16 sts.
- Repeat R2 and R3 until you have a total of 43 (49, 53, 59, 63, 69, 73, 79) R|s.
Front Panel
The Front Panel is worked continuously from the Back Panel and must have the same total number of rows. Two rows in the middle skip one st in the waist band to form 2 cord holes.
- R1 to R18 (20, 22, 26, 28, 30, 32, 36) continue with the st pattern.
- Next R| (R19, 21, 23, 27, 29, 31, 33, 37) WR R|: 1 ssblo in the first 12 sts, Ch 1, skip 1 (cord hole), 1 ss blo in the next 3 sts, 1 hsc in next sts to the end of the R|.
- Next 5 R|s up to R24 (26, 28, 32, 34, 37, 39, 43): repeat R3 and R2 from the back panel.
- R25 (27, 29, 33, 35, 38, 40, 44): repeat the row with cord hole, R19 (21, 23, 27, 29, 31, 33, 37).
- Next 18 (20, 22, 26, 28, 30, 32, 36) R|s, up to the total of 43 (49, 53, 59, 63, 69, 73, 79) R|s, continue working in the same stitch pattern.
- Fasten off, leaving a long tail for stitching the side of the skirt.
Bottom Edge
- Start| Join yarn in the side seam st. Ch 1.
- R1| 1 ss in each st around, join with a ss with first ss.
- R2| 1 ssblo in each st around, join with a ss with 1st ss. Fasten off.
Right Pocket
- Start| Ch 28. Start working the back loop of the Ch.
- R1| RS: 1 sc in the first st (second st from the Ch), 1 hsc in each of the next sts.
- R2 | RS: Repeat R1 (work the sts from back to front, same as the rest of the pattern).
- R3 – R6| Repeat R1 and R2.
- R7| 1 sc in 1st st, Dec 2 (see ABBREVIATIONS), 1 hsc to the end of the R|.
- R8| 1 sc in the first st (from back to front), 1 hsc in each of the next sts, until 5 sts left, Dec 2, 1 hsc in the last st.
- R9 – R10| Repeat R7 and R8.
- R11| 1 sc in 1st st, Dec 1 (see ABBREVIATIONS), 1 hsc to the end of the R|.
- R12| 1 sc in the first st (from back to front), 1 hsc in each of the next sts, until 3 sts left, Dec 1, 1 hsc in the last st.
- R13 – R14| Repeat R11 and R12. Fasten Off.
Left Pocket
The Left Pocket is worked as a mirror image of the Right Pocket. On the RS R|s, Dec at the end of the R|, and on the WS R|s, Dec at the beginning.
Cord
Ch 200 sts (or as many as needed), turn and ss into each of the sts. Fasten off.
Assembling and To Finish
Use the long tail to sew the opened skirt side. Next, fold the waist band ribbing and stitch it to create a doubled waist band ribbing.
Ensure the stitches are loose so the ribbing remains elastic and stretchy. Sew the pockets onto the skirt.
Insert the cord through the waist band holes using a safety pin. Wave in all ends and block the skirt to measurements.