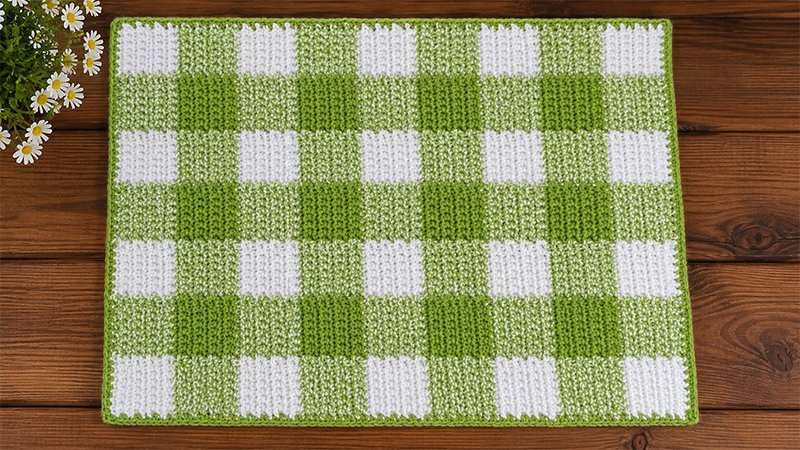
This intermediate-level project uses an innovative “join-as-you-go” technique to create a classic gingham patchwork look.
Instead of carrying multiple strands of yarn across every row, you will work the placemat in vertical strips, attaching each new column to the edge of the previous one as you crochet. The result is a beautifully textured, reversible fabric perfect for a cozy autumn table setting.
Quick Specs
-
Skill Level: Intermediate
-
Dimensions: 14 inches wide by 17 inches long
-
Gauge: 14 single crochets and 16 rows = 4 inches (worked in the gingham stitch pattern and blocked).
-
Materials Needed:
-
Yarn: Worsted weight (Size 4) 100% cotton yarn (e.g., WeCrochet Dishie). You will need three colors:
-
Color A (White/Swan): Approx. 84 yards
-
Color B (Multi/Clementine Twist): Approx. 130 yards
-
Color C (Orange/Clementine): Approx. 49 yards
-
-
Hook: Size J/10 (6.00 mm) hook (or size needed to meet gauge)
-
Tools: Tapestry needle for weaving in yarn ends
-
Key Pattern Techniques
Seamless Color Changes
To switch colors cleanly at the end of a block: Work your final single crochet of the row until you have 2 loops left on your hook. Drop your current yarn color, yarn over with the new color, and pull it through both loops to complete the stitch.
Carrying Yarn
To minimize weaving in ends, carry your idle yarn up the sides of the blocks. When making your turning chain on the color-change side, place the unused yarn strand over your working yarn, then make your chain-1 over it to trap it in place.
Layout Structure
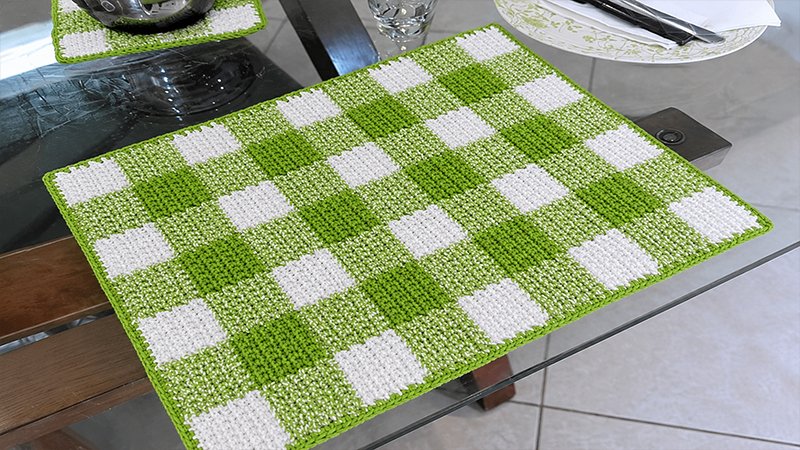
The placemat consists of 7 columns total, and each column features 9 stacked blocks. Each individual block is 7 stitches wide and 8 rows tall.
-
Odd-Numbered Columns (1, 3, 5, 7): Alternate between Color A and Color B.
-
Even-Numbered Columns (2, 4, 6): Alternate between Color B and Color C.
Step-by-Step Instructions
Column 1 (The Foundation Strip)
Using Color A, chain 8.
-
Row 1 (Right Side): Single crochet (sc) into the 2nd chain from your hook and into every chain across. Turn. (7 sc)
-
Rows 2–8: Chain 1, sc in every stitch across, turn. At the transition of Row 8, switch to Color B.
-
Rows 9–16: With Color B, chain 1, sc in every stitch across, turn. At the transition of Row 16, switch back to Color A.
-
Rows 17–72: Keep alternating your yarn colors every 8 rows (Color A and Color B) until you have completed 9 full squares (72 rows total). Fasten off your yarn at the end of Row 72.
Column 2 (The Next Stripe)
This column introduces Color C and connects directly to the side of Column 1.
With the right side facing you, insert your hook into the final foundation chain at the bottom of Column 1. Draw up a loop of Color B (leave a 5-inch tail), and chain 8.
-
Row 1 (Right Side): Sc into the 2nd chain from your hook and into each of the next 6 chains. Slip stitch (sl st) into the row ends of Rows 1 and 2 of Column 1 to secure it. Turn. (7 sc)
-
Row 2 (Wrong Side): Chain 1, sc in each of the 7 stitches across. Turn.
-
Row 3: Chain 1, sc in each of the 7 stitches across. Sl st into the next 2 row ends of Column 1. Turn.
-
Rows 4–8: Repeat the instructions for Rows 2 and 3 sequentially. At the end of Row 8, switch to Color C.
-
Row 9: With Color C, chain 1, sc in each stitch across. Sl st into the next 2 row ends of Column 1. Turn.
-
Row 10: Chain 1, sc in each stitch across. Turn.
-
Rows 11–16: Repeat the instructions for Rows 9 and 10 sequentially. At the end of Row 16, switch to Color B.
-
Row 17: With Color B, chain 1, sc in each stitch across. Sl st into the next 2 row ends of Column 1. Turn.
-
Row 18: Chain 1, sc in each stitch across. Turn.
-
Rows 19–24: Repeat the instructions for Rows 17 and 18 sequentially. At the end of Row 24, switch to Color C.
-
Rows 25–72: Repeat the pattern sequence established in Rows 9–24, alternating Color B and Color C blocks while joining to Column 1. Fasten off at the end of Row 72.
Column 3 (Returning to the First Color Palette)
With the right side facing you, insert your hook into the starting foundation chain at the bottom of Column 2. Draw up a loop of Color A (leave a 5-inch tail), and chain 8.
-
Row 1 (Right Side): Sc in the 2nd chain from your hook and each remaining chain. Sl st into the first 2 row ends of Column 2. Turn. (7 sc)
-
Row 2: Chain 1, sc in each stitch across. Turn.
-
Row 3: Chain 1, sc in each stitch across. Sl st into the next 2 row ends of Column 2. Turn.
-
Rows 4–8: Repeat Rows 2 and 3 sequentially. Change to Color B at the end of Row 8.
-
Row 9: With Color B, chain 1, sc across. Sl st into the next 2 row ends of Column 2. Turn.
-
Row 10: Chain 1, sc across. Turn.
-
Rows 11–16: Repeat Rows 9 and 10 sequentially. Change to Color A at the end of Row 16.
-
Row 17: With Color A, chain 1, sc across. Sl st into the next 2 row ends of Column 2. Turn.
-
Row 18: Chain 1, sc across. Turn.
-
Rows 19–24: Repeat Rows 17 and 18 sequentially. Change to Color B at the end of Row 24.
-
Rows 25–72: Repeat the pattern sequence established in Rows 9–24, alternating Color A and Color B blocks while joining to Column 2. Fasten off at the end of Row 72.
Completing the Rest of the Body
To build the rest of your placemat, continue adding strips across your work:
-
Columns 4 and 6: Follow the instructions for Column 2.
-
Columns 5 and 7: Follow the instructions for Column 3.
Border and Finishing
The Edging
-
Round 1: Turn your work so the right side faces you. Join Color C with a slip stitch into the very first stitch on the top edge.
-
Top Edge: Work 2 sc in that first stitch (creates part of the corner). Sc across the top edge to the final stitch. Work 3 sc into the final stitch to turn the corner.
-
First Side: Working down the row ends, distribute your stitches evenly: place 5 sc along the edge of the first square, 6 sc across each of the middle 7 squares, and 5 sc across the edge of the final square.
-
Bottom Edge: Work 3 sc into the first foundation chain to turn the corner. Sc across the bottom chains to the last loop, then work 3 sc into that last chain.
-
Second Side: Work back up the remaining raw edge, matching the stitch distribution from the first side (5 sc for the outer squares, 6 sc for each inner square).
-
To Finish Round: Add 1 more sc into your starting corner space to complete it. Join with a slip stitch to your first sc. Fasten off your yarn.
-
Finishing Touches
Use your tapestry needle to securely weave in all loose yarn tails on the back of the placemat. For the straightest edges and crispest look, wet block your finished placemat to its final 14 x 17-inch dimensions.