
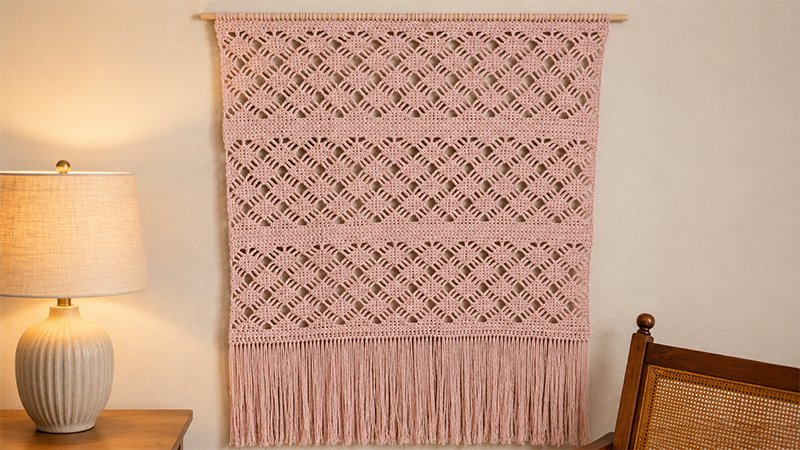
Add a touch of modern macrame flair to your home with this stunning tapestry. This project beautifully pairs the dense, structured texture of the Petit Pois stitch with an elegant, airy diamond lace pattern.
Using natural cotton yarn gives it an authentic, earthy feel that looks incredibly high-end. While it uses foundational crochet stitches, the intricate layout and unique stitch combinations make it perfect for an intermediate maker looking for an engaging project.
Project Overview
-
Difficulty: Intermediate
-
Dimensions: Approximately 25.5” wide by 20” long (excluding the fringe)
-
Gauge: 7 stitches by 3 rows = 2” x 1” (measured over the Petit Pois section)
Materials & Tools
-
Yarn: ~510 yards of Medium Weight (Category 4) 100% Cotton Yarn (e.g., Lily’s Sugar’n Cream in a neutral tone like Ecru)
-
Hook: US Size I/9 (5.5 mm) crochet hook
-
Notions: Large-eye tapestry needle, sharp scissors, a 0.5-inch wooden dowel or branch, and a fine-tooth or wire comb (optional, for the fringe)
Special Stitches & Notes
-
Stitch Count Adjustments: To alter the width, ensure your initial foundation chain is a multiple of .
-
Working into Spaces: For the lace sections, insert your hook under the chain loops (around the chain space) rather than into the individual chain stitches.
-
Petit Pois (PP) Stitch:
-
To start a row: Chain 2. Insert hook into the very first stitch at the base of your chain, draw up a loop. Insert hook into the next stitch, draw up a loop. Yarn over and pull through all 3 loops on your hook.
-
To continue: Insert hook into the same stitch where your previous stitch just ended, pull up a loop. Insert hook into the next stitch, pull up a loop. Yarn over and pull through all 3 loops.
-
Row End: The final portion of the last stitch should be worked directly into the turning chain.
-
Step-by-Step Pattern Instructions
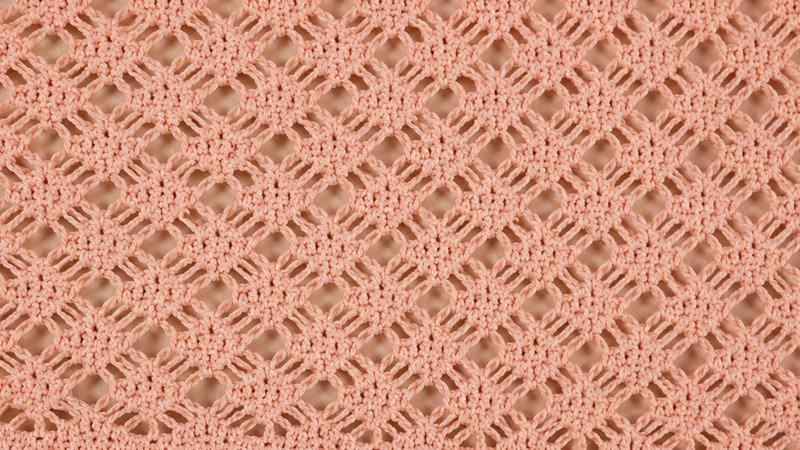
The Foundation & Base
-
Row 1: Work 91 foundation single crochets (fsc). Turn your work. (91 sts)
-
Row 2: Chain 2 (counts as a stitch here and throughout). Work a PP stitch across the entire row. Turn. (91 sts)
-
Row 3: Chain 2. Work a PP stitch in each stitch across, ensuring your final insertion goes into the top of the turning chain. Turn. (91 sts)
Part 1: The Initial Lace Grid
-
Row 4: Chain 5. *Work 1 sc into each of the next 7 sts, chain 5, skip 2 sts. Repeat from * across until only 1 PP stitch and the turning chain remain. Chain 2, skip 1 st, and work 1 dc into the top of the turning chain. Turn.
-
Row 5: Chain 1. Work 1 sc into the dc. Chain 3, skipping over the ch-2 space and the first sc. *Work 1 sc into each of the next 5 sc, chain 3, skip 1 sc, work 1 sc directly into the middle of the ch-5 loop, chain 3, skip 1 sc. Repeat from * across, ending your final repeat with 1 sc into the last ch-5 space. Turn.
-
Row 6: Chain 1. Work 1 sc into the first sc, then 1 sc into the start of the ch-3 loop. *Chain 3, skip 1 sc, work 1 sc into each of the next 3 sc, chain 3, skip 1 sc, work 1 sc into the end of the ch-3 loop, 1 sc into the next sc, and 1 sc into the start of the next ch-3 loop. Repeat from * across. Turn.
-
Row 7: Chain 1. Work 1 sc into each of the first 2 sc, then 1 sc into the start of the ch-3 loop. *Chain 3, skip 1 sc, 1 sc into the next sc, chain 3, skip 1 sc, 1 sc into the end of the ch-3 loop, 1 sc into each of the next 3 sc, and 1 sc into the start of the next ch-3 loop. Repeat from * across, finishing with 1 sc into each of the final 2 sc. Turn.
-
Row 8: Chain 1. Work 1 sc into each of the first 3 sc, then 1 sc into the start of the ch-3 loop. *Chain 5, skip the single crochet, 1 sc into the end of the next ch-3 loop, then 1 sc into each of the next 5 sc, and 1 sc into the start of the next ch-3 loop. Repeat from * across, finishing with 1 sc into each of the last 3 sc. Turn.
-
Row 9: Chain 1. Work 1 sc into each of the first 3 sc. *Chain 3, skip the sc, 1 sc into the center of the ch-5 loop, chain 3, skip the sc, 1 sc into each of the next 5 sc. Repeat from * across, adjusting the final repeat to end with 1 sc in each of the last 3 sc. Turn.
-
Row 10: Chain 1. Work 1 sc into each of the first 2 sc. *Chain 3, skip 1 sc, 1 sc into the end of the ch-3 loop, 1 sc into the next sc, 1 sc into the start of the next ch-3 loop, chain 3, skip 1 sc, 1 sc into each of the next 3 sc. Repeat from * across, ending the final repeat with 1 sc into each of the last 2 sc. Turn.
-
Row 11: Chain 1. Work 1 sc into the first sc. *Chain 3, skip 1 sc, 1 sc into the end of the ch-3 loop, 1 sc into each of the next 3 sc, 1 sc into the start of the next ch-3 loop, chain 3, skip 1 sc, 1 sc into the next sc. Repeat from * across, ending with 1 sc in the last sc. Turn.
-
Row 12: *Chain 5, skip the sc, 1 sc into the end of the ch-3 loop, 1 sc into each of the next 5 sc, 1 sc into the start of the next ch-3 loop. Repeat from * across, finishing the row with a chain 2 and 1 dc in the final sc. Turn.
-
Rows 13–23: Repeat the sequence from Rows 5 through 12. Your lace section will conclude on a Row 7 repetition.
Part 2: Textured Solid Divider
-
Row 24: Chain 1. Work 1 sc into each of the first 3 sc. *Place 2 sc inside the ch-3 space, skip the next sc, place 2 sc inside the next ch-3 space, then work 1 sc into each of the next 5 sc. Repeat from * across, ending with 1 sc into each of the last 3 sc. Turn. (91 sts)
-
Rows 25–28: Repeat Row 3 to build your solid Petit Pois block. Turn.
Part 3: Middle Lace Grid
Rows 29–48: Repeat the entire lace sequence from Rows 4 through 23.
Part 4: Second Solid Divider
Rows 49–53: Repeat the solid section breakdown from Rows 24 through 28.
Part 5: Final Lace Grid
Rows 54–73: Repeat the lace sequence from Rows 4 through 23 once more.
Part 6: The Border Finish
Rows 74–76: Repeat Rows 24 through 26 to match the lower solid borders. Fasten off your yarn and weave in all loose ends.
Assembly & Finishing Touches
1. Adding the Fringe
Cut 91 lengths of yarn, each measuring roughly 16 inches. Fold a strand in half, use your crochet hook to pull the loop through a foundation stitch along the bottom edge, and pull the tails through the loop to secure a lark’s head knot. Repeat across all 91 stitches. Use a wire brush or stiff comb to gently fray the strands for a plush, brushed finish.
2. Blocking
To open up the delicate diamond lace and ensure the piece hangs perfectly straight, steam block the panel thoroughly. Avoid pressing the iron directly onto the cotton; instead, let the steam relax the fibers, paying special attention to straightening out the fringe.
3. Mounting to the Dowel
Cut a 9-yard length of yarn. Thread it onto your tapestry needle. Leaving a small tail, insert the needle through the first stitch of Row 76, loop it tightly over your wooden dowel, and pass back through the same stitch a second time.
Secure each stitch to the rod with two structural loops, working your way cleanly from one side to the other. Knot securely at the end, and attach an extra piece of yarn to the ends of the dowel to create a hanger.


