Crafting a handmade accessory offers both practical utility and a creative outlet.
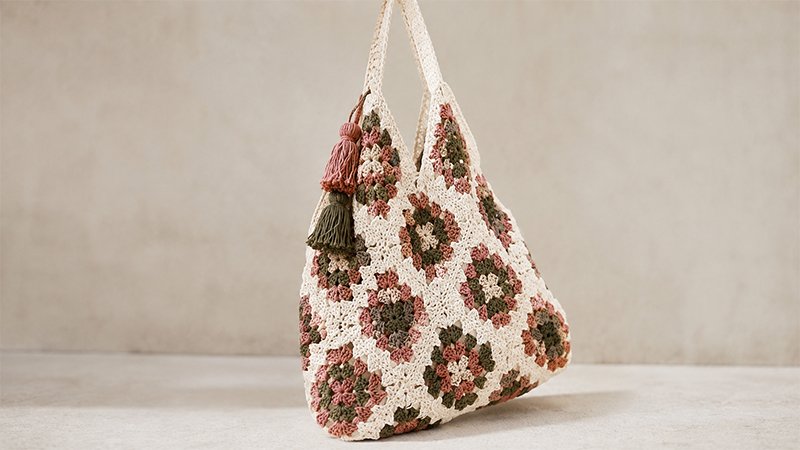
The Magnolia Tote Bag is a stylish, sturdy crochet project featuring classic multi-colored motifs assembled into a spacious, market-ready tote.
Utilizing durable worsted-weight mercerized cotton yarn, this project yields a washable structure perfect for trips to the farmers market, beach outings, or everyday errands.
Below is a complete, original breakdown of the materials, specifications, and step-by-step instructions needed to construct your own custom vintage-inspired tote bag.
Project Specifications
-
Finished Dimensions: Approximately 20 inches wide by 16 inches long
-
Gauge: A 4-round motif measures 4.5 inches by 4.5 inches
-
Skill Level: Easy / Beginner-Friendly
Required Materials
-
Yarn: Worsted weight (#4) mercerized cotton yarn (approx. 310 grams / 680 yards total)
-
Color A (Main Border/Joining): 2 skeins (approx. 200g)
-
Color B (Accent 1): 1 skein (approx. 100g)
-
Color C (Accent 2): 1 skein (approx. 100g)
-
Color D (Accent 3): 1 skein (approx. 100g)
-
-
Hook: 4.25 mm (US Size G) crochet hook
-
Notions: Tapestry needle, sharp scissors
Motif Color Layouts
Produce a total of 24 individual four-round motifs based on the color arrangements below. Every motif uses Color A for the final outer round to ensure seamless joining.
Motif Pattern
Chain 3, slip stitch into the first chain to form a center ring.
-
Round 1: Chain 3 (counts as double crochet throughout), work 2 double crochet into the ring, *chain 2, work 3 double crochet into the ring; repeat from * 3 times total, chain 2. Slip stitch to top of initial chain-3 to close. Fasten off. (12 double crochet, 4 corner spaces)
-
Round 2: Join new shade in any corner space. Chain 3, work (2 double crochet, chain 2, 3 double crochet) in same space. *Chain 1, work (3 double crochet, chain 2, 3 double crochet) in next corner space; repeat from * 2 more times, chain 1. Slip stitch to top of initial chain-3 to close. Fasten off.
-
Round 3: Join next shade in any corner space. Chain 3, work (2 double crochet, chain 2, 3 double crochet) in same space, chain 1, work 3 double crochet in side space. *Chain 1, work (3 double crochet, chain 2, 3 double crochet) in corner space, chain 1, work 3 double crochet in side space; repeat from * 2 more times, chain 1. Slip stitch to top of initial chain-3 to close. Fasten off.
-
Round 4: Join Color A in any corner space. Chain 3, work (2 double crochet, chain 2, 3 double crochet) in same space, [chain 1, 3 double crochet in next side space] twice. *Chain 1, work (3 double crochet, chain 2, 3 double crochet) in corner space, [chain 1, 3 double crochet in next side space] twice; repeat from * 2 more times, chain 1. Slip stitch to top of initial chain-3 to close. Fasten off and weave in all yarn tails.
Bag Assembly
-
Lay out the 24 finished motifs in a grid layout (typically 4 squares wide by 6 squares long, folded to form the body).
-
Thread a tapestry needle with Color A yarn.
-
Align the edges of adjacent motifs and join them using a whip stitch or flat slip stitch seam through the back loops only.
-
Fold the joined fabric panels into the main bag shape and seam the side edges shut, leaving the top opening unstitched.
Handles & Top Border Construction
Border Round 1
Attach Color A yarn at any top corner point along the bag opening. Work single crochet stitches evenly across the top edge of the motifs until reaching the outer point where the first strap will attach.
First Strap
Chain 61 stitches (or to desired shoulder strap length). Taking care not to twist the chain, anchor it with a single crochet to the top point of the adjacent motif across the opening gap.
Continue Rim
Single crochet evenly across to the opposite side of the bag body.
Second Strap
Repeat the chain process for the second handle, anchoring it symmetrically on the opposite face.
Border Rounds 2–4
Single crochet continuously around the entire top rim and up into every chain stitch along both straps. Complete 2 to 3 additional continuous rounds to build sturdy, comfortable handles.
Finishing
Fasten off securely, cut the working yarn, and weave all remaining ends into the interior fabric structure using your tapestry needle.