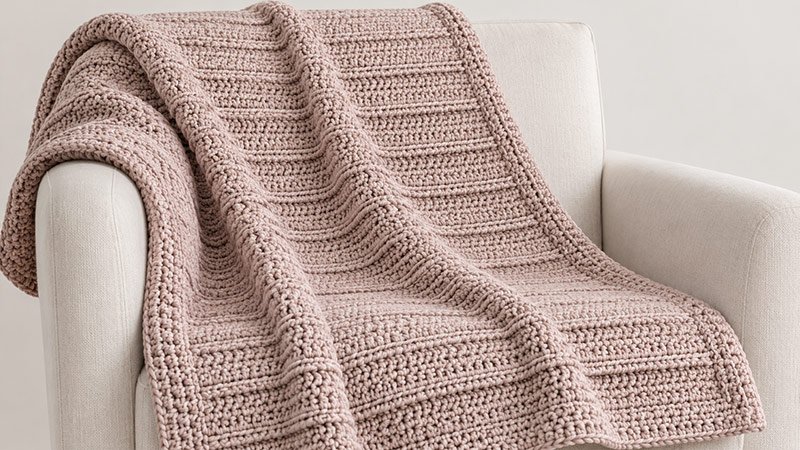
The Adagio Throw is a soft throw for slow days and quiet nights. Smooth rows and raised lines give it a soft feel. Lay it on a chair.
Fold it at the foot of your bed. Keep it near as you read or rest. Use single crochet and half double crochet to make the rows.
The steps are short and easy to learn. A plain edge gives the throw a neat look. Pick a soft shade that fits your room, then stitch at your own pace.
Materials
- 1,800–2,100 yards of worsted-weight yarn, category #4. This includes the border. You may need more or less.
- 5.5 mm crochet hook. Use a size that meets gauge.
- Yarn needle.
- Scissors.
- Stitch markers.
- Tape to check size.
- A clean, flat place to shape the throw.
Use smooth yarn so the stitches are easy to see. Use one shade for the whole throw. Or use a new shade for the border. For a border in its own shade, set aside 200–250 yards from the total yarn.
Gauge
16 sts and 16 rows = 4 inches. Check this gauge in the four-row stitch repeat. Wash and dry the swatch first.
Make a small swatch before you start:
- Ch 25.
- Row 1: Sc in the second ch from the hook. Sc in each ch across. Turn. 24 sc.
- Row 2: Ch 1. Sc in each st across. Turn.
- Row 3: Ch 1. Hdc in the BLO of each st across. Turn.
- Row 4: Ch 1. Hdc through both top loops of each st across. Turn.
- Work these four rows again. Make two sc rows, one BLO hdc row, then one hdc row through both loops. Work at least 24 rows in all.
- Wash and dry the swatch. Follow the steps on the yarn label.
- Check 4 inches near the middle. Do not stretch the swatch.
Too many sts in 4 inches? Try a larger hook. Too few sts? Try a smaller hook.
Check the row count, too. It helps you get the right length.
Finished Measurements:
The throw is about 42 × 54 inches. This size includes a border about 1 inch wide on each side.
The main part is about 40 × 52 inches if you meet the gauge.
The size and yarn use may vary. They depend on your yarn, how tight you stitch, and how wide you make the border.
Notes
- Use US crochet terms.
- Work the main panel in rows, back and forth.
- Each row has 160 sts.
- The ch 1 at the start does not count as a st.
- Work the first st in the first st of the row below.
- Work the last st in the last st of the row below.
- Turn at the end of each row.
- Work through both top loops unless the steps say BLO.
- Repeat four rows to give the throw soft ridges.
- Work the border in rounds. Join each round. Do not turn.
- This is a new draft. A full sample has not been made. The gauge, yarn needs, and final size still need to be checked.
Abbreviations
- BLO: Back loop only.
- ch: Chain.
- hdc: Half double crochet.
- rep: Repeat.
- sc: Single crochet.
- sl st: Slip stitch.
- st / sts: Stitch / stitches.
Single crochet — sc: Put the hook in the stated st. Yarn over. Pull up a loop. Yarn over once more. Pull through both loops.
Half double crochet — hdc: Yarn over. Put the hook in the stated st. Yarn over and pull up a loop. Yarn over once more. Pull through all three loops.
Back loop only — BLO: Hold the row as you would to work it. Find the V on top of the st. It has two loops. Work in the loop farthest from you.
Pattern Instructions
Step 1: Make the Starting Chain
Ch 161.
Keep each ch loose and even. Tight chains can pull the base edge in.
If you chain too tight, use a hook one size up. Use your main hook for Row 1.
Step 2: Work the First Four Rows
Row 1: Sc in the second ch from the hook. Sc in each ch across. Turn. 160 sc.
The skipped ch does not count as a st. Count the row before you move on.
Row 2: Ch 1. Sc in each st across. Turn. 160 sc.
Work through both top loops. These two sc rows form a firm, smooth band.
Row 3: Ch 1. Hdc in the BLO of each st across. Turn. 160 hdc.
Work the first hdc into the back loop of the first st. Continue in the same way to the end. The unused front loops form a small ridge.
Row 4: Ch 1. Hdc through both top loops of each st across. Turn. 160 hdc.
Keep the stitches loose enough for the fabric to bend and drape.
Step 3: Continue the Pattern Repeat
Row 5: Ch 1. Sc in each st across. Turn. 160 sc.
Row 6: Ch 1. Sc in each st across. Turn. 160 sc.
Row 7: Ch 1. Hdc in the BLO of each st across. Turn. 160 hdc.
Row 8: Ch 1. Hdc through both top loops of each st across. Turn. 160 hdc.
Rep Rows 5–8 another 50 times, ending with Row 208.
You will have 52 complete four-row groups in the main panel.
Use this guide to track each group:
| Row within each group | Stitch |
|---|---|
| First row | Sc through both loops |
| Second row | Sc through both loops |
| Third row | Hdc in BLO |
| Fourth row | Hdc through both loops |
Keep 160 sts in every row.
Place a marker in the first and last st if the edges are hard to see. Move the markers as you work.
Lay the panel flat from time to time. Check that both side edges stay straight and that the bottom edge does not pull inward.
After Row 208, fasten off.
Step 4: Weave In the Ends
Thread each yarn tail onto a yarn needle.
Weave it through several stitches on the side you plan to use as the back. Change direction and pass through a few more stitches to help hold the tail in place.
Do not pull the tails tight. Keep the fabric soft and flat.
Step 5: Add the Border
Lay the panel flat. Keep your chosen front face up. Join the border yarn in the first st at any corner.
Round 1:
- Ch 1. Work 3 sc in the corner st. Mark the middle sc.
- Sc in each st across the first top or bottom edge. Stop before the next corner st.
- Work 3 sc in that corner st. Mark the middle sc.
- Work sc evenly down the side edge.
- Work 3 sc in the next corner st. Mark the middle sc.
- Sc across the other top or bottom edge.
- Work 3 sc in the last corner st. Mark the middle sc.
- Work sc evenly along the last side.
- Join with a sl st to the first sc.
On the starting-chain edge, work into each unused chain spot. Use each corner spot just once.
Start with about 208 sc between the corner groups on each long side. Spread them evenly across the row ends. Use this count as a guide. Change the spacing as needed to keep the border flat.
If the edge waves, use fewer side sts. If it pulls in, add a few sts.
Round 2: Ch 1. Sc in each st around. Work 3 sc in each marked corner st. Move each marker to the middle sc of the new corner group. Join with a sl st to the first sc.
Rounds 3–4: Rep Round 2.
Check the border after each round. Four rounds should make it close to 1 inch wide. Your tension may change this width. Add one more round if needed.
Fasten off. Weave in all ends that are left.
Step 6: Wash and Shape the Throw
Follow the care steps on the yarn label.
Lay the throw flat. Gently shape it into a rectangle. Smooth the corners and straighten the edges without stretching the fabric.
Let it dry fully before folding or using it.
Adjusting the Size
To change the width, add or remove starting chains. You do not need a set chain multiple. Each row has one less stitch than the starting chain count.
At the stated gauge, 16 more chains add about 4 inches to the main panel’s width.
To change the length, add or remove full four-row groups. At the stated gauge, each group adds about 1 inch.
Change the yarn amount to suit the new size.