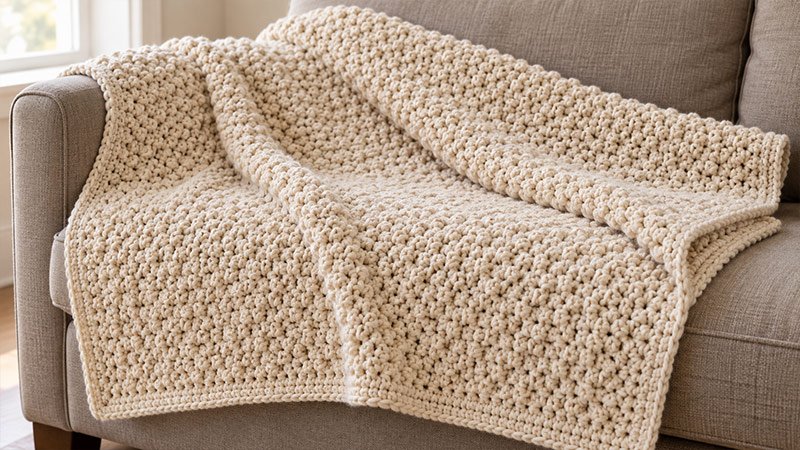
This lemon peel stitch throw uses single and double crochet. These stitches make a soft cloth with small, raised bumps.
Each row has the same steps. This makes the stitch easy to learn. Use one shade, or try wide stripes. Choose what suits your room.
A plain border frames the throw. It helps keep the edges neat. The steps give stitch counts and size notes. They also share tips for a smooth finish.
Check your gauge first. This helps your throw reach the size in the steps below.
Yarn and Materials
- Yarn: Worsted-weight yarn, category 4. Choose a soft yarn suited to blankets.
- Estimated yardage: 1,800–2,200 yards, including the border. Yarn use will vary with your gauge and fiber.
- Number of skeins: For skeins with 200 yards each, allow 9–11 skeins.
- Hook: 5.5 mm crochet hook, or the size needed to meet gauge.
- Two stitch markers.
- Yarn needle.
- Scissors.
- Tape measure.
Gauge: 14 sts and 14 rows = 4 inches in lemon peel stitch, measured after washing and drying the swatch as directed on the yarn label.
Finished size: About 42 × 54 inches, including a border about 1 inch wide on each edge.
Skill level: Beginner, with knowledge of sc and dc.
Abbreviations
This pattern uses US crochet terms.
- ch: Chain.
- sc: Single crochet.
- dc: Double crochet.
- sl st: Slip stitch.
- st / sts: Stitch / stitches.
- rep: Repeat.
- RS: Right side.
Making the Blanket
1. Read the Pattern Notes
- Work the blanket back and forth in rows.
- Turn at the end of each row.
- The ch 1 at the start of a row does not count as a st.
- Work through both top loops of each st.
- Each body row has 140 sts: 70 sc and 70 dc.
- Begin each body row with sc and end with dc.
- From Row 2 onward, work sc into each dc and dc into each sc.
- Mark the first and last st to help keep the edges straight.
- Size and yarn amounts are estimates. This written pattern has not been physically tested.
2. Make a Gauge Swatch
Ch 29.
Swatch Row 1: Sc in the second ch from the hook. Dc in the next ch. Rep [sc in next ch, dc in next ch] across. Turn. 28 sts.
Swatch Row 2: Ch 1. Sc in the first st, dc in the next st. Rep [sc in next st, dc in next st] across. Turn. 28 sts.
Rep Swatch Row 2 until you have 28 rows.
Wash and dry the swatch as you plan to care for the throw. Measure a 4-inch square near the center.
- If you have more than 14 sts in 4 inches, try a larger hook.
- If you have fewer than 14 sts in 4 inches, try a smaller hook.
- Check row gauge too, as it affects the length.
3. Make the Foundation Chain
Ch 141 loosely.
If the chain feels tight, use a hook one size larger for the chain. Switch back to your main hook for Row 1.
4. Work Row 1
- Sc in the second ch from the hook.
- Dc in the next ch.
- Rep [sc in next ch, dc in next ch] to the end.
- Turn. 140 sts.
- The final st is a dc.
5. Work Row 2
- Ch 1.
- Sc in the first st. This is the last dc of the prior row.
- Dc in the next st.
- Rep [sc in next st, dc in next st] across.
- Turn. 140 sts.
6. Work the Remaining Body Rows
Rows 3–182: Rep Row 2.
Check your stitch count from time to time. Each row must have 140 sts.
At the stated gauge, the body should measure about 40 × 52 inches. For a different length, repeat Row 2 until the body reaches your chosen length.
After the final row, fasten off. Place a marker on the side you want to use as the RS.
7. Add Stripes, If Desired
For broad stripes, change shades every 14 rows.
To change yarn:
- Work the last dc of the row until two loops remain on the hook.
- Yarn over with the new shade.
- Pull through both loops to finish the dc.
- Turn and work the next row with the new shade.
Leave tails about 6 inches long. Weave them in during finishing.
8. Work the Border
Lay the blanket flat before you start. Use the same yarn shade or choose a shade that frames the body.
Round 1:
- With RS facing, join yarn in a corner.
- Ch 1. Work 3 sc in the corner st.
- Sc across the top edge to the next corner. Work 3 sc in that corner.
- Work sc evenly down the side edge. As a starting point, work about 1 sc in each row end. Adjust the spacing if the edge pulls or forms waves.
- Work 3 sc in the next corner.
- Sc across the unused foundation loops along the bottom edge.
- Work 3 sc in the final corner.
- Sc evenly up the remaining side edge.
- Join with a sl st to the first sc.
- Mark the middle sc of each three-stitch corner group.
Round 2:
- Ch 1. Sc in each st around, working 3 sc in each marked corner st.
- Join with a sl st to the first sc. Move each marker to the new middle corner st.
- Rounds 3–4: Rep Round 2.
- If needed, add another round to bring the border close to 1 inch wide. Check that the blanket lies flat after each round.
Fasten off.
9. Finish the Throw
Use a yarn needle to weave in all loose ends. Run each tail through several stitches, then change direction to help hold it in place.
Wash and dry the throw according to the yarn label. Gently shape it while damp, without stretching the fabric.
Adjusting the Size
To change the width: Choose an even body stitch count. Ch that number plus 1.
For example:
- Ch 113 for 112 sts.
- Ch 141 for 140 sts.
- Ch 169 for 168 sts.
To change the length: Add or remove body rows.
At the stated gauge, estimate the body size with:
- Width in inches: Stitch count ÷ 14 × 4.
- Length in inches: Row count ÷ 14 × 4.
A 1-inch border adds about 2 inches to both the total width and length.