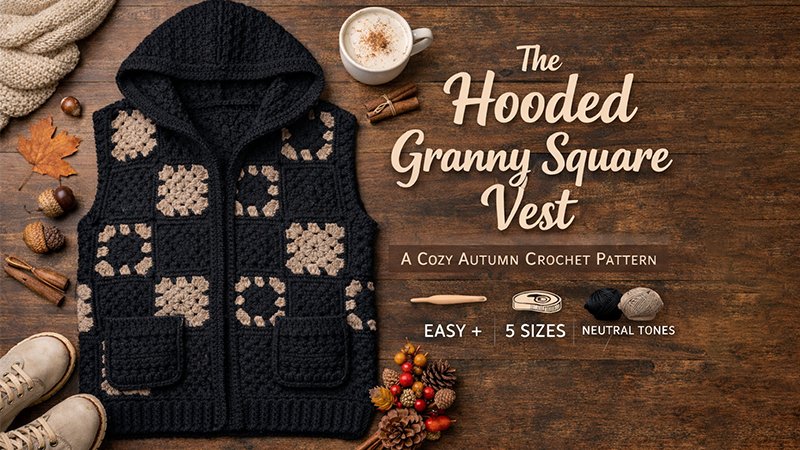
Vintage crochet styles have made a beautiful return to modern fashion, appearing in boutiques and storefronts from New York to small-town markets. This Hooded Granny Square Vest blends nostalgic charm with practical layering for fall and winter.
Inspired by the beloved “Arlo Granny Cardigan,” this vest uses simple granny squares and neutral tones for a timeless look. Whether you prefer bold black and taupe contrast or want to create a colorful stash-buster version, this pattern is versatile and beginner-friendly.
Skill Level: Easy +
Perfect for crocheters comfortable with basic granny squares and ready to construct their first garment.
Pattern Overview & Specifications
Sizes
Small (Medium, Large, XL, XXL)
- Finished Bust: 36” (40”, 44”, 48”, 52”)
- Finished Width (laid flat): 18” (20”, 22”, 24”, 26”)
- Length: Approx. 24¾”
Materials
- Hook: US I (5.25 mm)
- Yarn: Lion Brand Touch of Alpaca (100g skeins)
- Black: 5 (5, 6, 6, 7) skeins
- Taupe: 1 skein
- Notions: Tapestry needle, scissors, stitch markers
Gauge (Very Important!)
Correct sizing depends on gauge.
- A completed 3-round granny square should measure 4.25” x 4.25”
- A 4” x 4” double crochet swatch = 12 dc stitches and 5¼ rows
If your square is:
- Too small → go up a hook size
- Too large → go down a hook size
Phase 1: Granny Squares (Make 30 Total)
- 14 Two-Tone Squares:
Round 1 – Black
Round 2 – Taupe
Round 3 – Black - 16 Solid Black Squares:
All three rounds in Black
Granny Square Pattern
Foundation:
With Black, ch 4, sl st to first chain to form a ring.
Round 1
- Ch 3 (counts as dc here and throughout).
- 2 dc in ring, ch 2.
- (3 dc in ring, ch 2) repeat 3 more times.
- Sl st to top of beginning ch 3 to join.
Total: 4 corner clusters (12 dc)
Round 2
Sl st into next ch-2 corner space.
- Ch 3, 2 dc in same corner space.
- Ch 2.
- 3 dc in next corner space, ch 2, 3 dc in same space; repeat from * around.
- Sl st to top of beginning ch 3.
Total: 8 clusters (24 dc)
Round 3
Sl st into next corner space.
- Ch 3, 2 dc in same corner space.
- Ch 1.
- 3 dc in next ch-1 space.
- Ch 1.
- (3 dc, ch 2, 3 dc) in next corner space; ch 1; 3 dc in next ch-1 space; ch 1 repeat from * around.
- Sl st to join.
Fasten off and weave in ends.
Phase 2: Panel Construction
The vest consists of:
- 1 Back Panel
- 2 Front Panels
Squares are seamed first, then side width is adjusted using double crochet rows.
Back Panel
Layout
Arrange squares 5 tall x 4 wide.
Alternate solid and two-tone squares for balanced color placement.
Seaming
Use a flat slip stitch seam (or preferred joining method).
Side Extensions
Attach Black yarn at the top corner of one side.
Work dc stitches evenly down the entire side edge.
- Size S: 1 row
- Size M: 2 rows total
- Size L: 3 rows total
- Size XL: 5 rows total
- Size XXL: 6 rows total
Repeat on opposite side.
Finished back width should measure:
18” (20”, 22”, 24”, 26”)
Front Panels (Make 2)
Layout (Top to Bottom)
- Two-tone
- Solid
- Two-tone
- Solid
- Solid
Seam vertically into one column (5 squares tall).
Outer Side Extensions
Attach Black yarn at the outer edge (underarm side only).
Work dc evenly along the full length.
Add:
- S: 3 rows
- M: 4 rows
- L: 5 rows
- XL: 7 rows
- XXL: 8 rows
Important: Only extend ONE side of each front panel.
Phase 3: Assembly
Shoulders
Place front panels on top of back panel (right sides facing).
Ensure extension rows are positioned at outer edges.
Seam shoulders securely.
Side Seams
Seam from bottom upward, leaving arm openings approximately 8–9” (or desired fit).
Blocking
Light blocking is recommended to shape panels and even out seams.
Phase 4: Hood & Finishing
Hood
- Place stitch markers approx. 4½” down from shoulder seam on each front panel.
- Attach yarn at one marker.
- Dc across back neckline to opposite marker.
- Continue working rows of dc back and forth until hood measures approx. 14” tall.
- Fold hood in half and seam top closed.
Collar
Attach Black yarn at lower front corner.
Work 1 row of hdc evenly:
- Up front edge
- Around hood opening
- Down opposite front edge
Follow with 2 rows of dc.
Bottom Edging
Attach yarn at bottom corner.
Work 3 rows of dc evenly across entire bottom edge.
Optional Pockets
- Make 2 solid granny squares.
- Work 1 round of dc on three sides (3 dc in corners).
- Work 1 row of sc across top edge.
- Sew to lower front panels, leaving top open.
Expert Tips
- Use bright lighting when working with black yarn.
- For larger sizes (3X+), add extra granny squares or more dc side rows.
- Sleeves can be added by constructing vertical square panels.
- Flat slip stitch join creates the cleanest seam finish.
Final Notes
This pattern has been tested; however, handmade garments always depend on personal gauge and tension. Adjust as needed for your preferred fit.
Enjoy creating your cozy, vintage-inspired autumn vest! 🧶✨