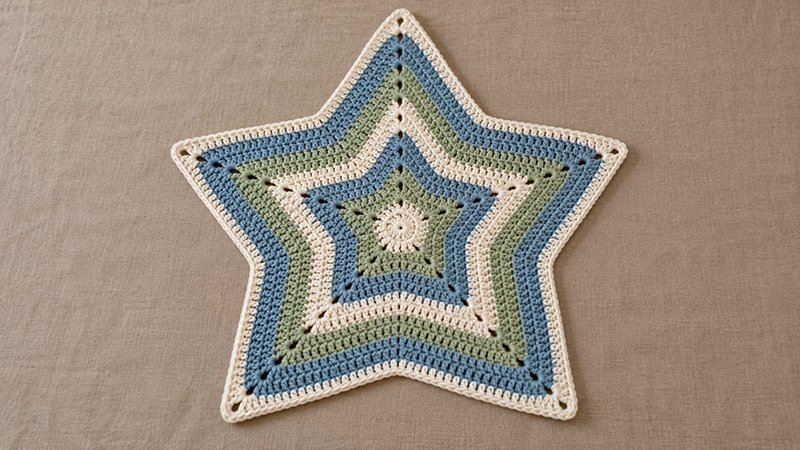
This star blanket starts at the center and grows in rounds. Five points form the star. Double crochet stitches make the fabric, while chain spaces shape the tips. Skipped stitches form the dips between the points.
Use one shade for the whole blanket, or change shades to make stripes. The blanket is made in one piece, with no seams to sew.
Pattern Details
- Skill level: Confident beginner.
- Crochet terms: US terms.
- Shape: Five-point star.
- Finished size: About 40–46 inches across the widest part after 36 rounds and a border. Your gauge will affect the size.
- Construction: Work from the center outward in joined rounds.
- Turning: Do not turn between rounds.
Materials
- Worsted-weight yarn, Category 4.
- A 5.5 mm crochet hook, or a size that gives a soft, flat fabric.
- A yarn needle.
- Scissors.
- Five stitch markers.
- A tape measure.
Yarn and Yardage
Allow about 1,600–2,000 yards of worsted-weight yarn.
Use a smooth yarn so you can see the stitches and count them with ease. If you use more than one shade, choose yarns of the same weight and similar fiber content.
Buy some extra yarn if you plan to add more rounds or a wider border.
Suggested Stripe Plan
For a three-color blanket:
- Rounds 1–6: Color A.
- Rounds 7–12: Color B.
- Rounds 13–18: Color C.
- Rounds 19–24: Color A.
- Rounds 25–30: Color B.
- Rounds 31–36: Color C.
- Border: Color A.
You can also work the whole blanket in one color.
Abbreviations
- ch: Chain
- dc: Double crochet
- sc: Single crochet
- sl st: Slip stitch
- st / sts: Stitch / stitches
- sp: Space
- sk: Skip
- rep: Repeat
- rnd: Round
Gauge
Aim for about 12 dc and 7 rows = 4 inches in a flat dc swatch.
Gauge is a guide for this blanket. A loose gauge makes a larger blanket and may use more yarn. A tight gauge makes a smaller, firmer blanket.
Check that the fabric feels soft and that the star lies flat.
Stitch Groups and Shaping
Starting point group: Ch 3, then work (1 dc, ch 2, 2 dc) in the same point sp. The ch 3 counts as the first dc. This gives you (2 dc, ch 2, 2 dc) in total.
Point group: Work (2 dc, ch 2, 2 dc) in a ch-2 sp.
Valley skip: Sk the next 2 dc. These are the last dc before the dip and the first dc after the dip. Do not add a chain over the skipped sts.
Pattern Notes
- Count the starting ch 3 as 1 dc.
- Join each rnd with a sl st. Join in the top of the starting ch 3.
- Do not count sl sts as sts.
- Work each dc through both loops.
- Work point groups in the ch-2 sps.
- Keep five point sps in each rnd.
- Mark each point sp so it is easy to find.
- From Rnd 3 on, sk exactly 2 dc at each valley.
- Do not work in those skipped sts in later rnds.
- Count your sts before you start the next rnd.
Pattern Instructions
Start the Center
Ch 4. Join with a sl st in the first ch to form a ring.
Round 1: Center Circle
- Ch 3. Work 9 dc into the ring.
- Join with a sl st in the top of the starting ch 3.
- Count: 10 dc.
Round 2: Form the Five Points
Ch 3. Work (2 dc, ch 2, 3 dc) in the same st at the base of the ch 3.
The starting ch 3 and the next 2 dc form the first 3-dc group.
Then:
- Sk the next dc.
- Work (3 dc, ch 2, 3 dc) in the next dc.
- Rep Steps 1–2 three more times.
- Sk the last dc.
- Join with a sl st in the top of the starting ch 3.
You now have five point groups. Each group has 3 dc on each side of its ch-2 sp.
Place a marker in each ch-2 sp.
Count: 30 dc and 5 ch-2 sps.
Round 3: Shape the Valleys
Sl st in each of the next 2 dc. Sl st into the first ch-2 sp.
Work the starting point group in this sp.
Then:
- Dc in each of the next 2 dc.
- Sk the next 2 dc at the valley.
- Dc in each of the next 2 dc.
- Work a point group in the next ch-2 sp.
Rep Steps 1–4 three more times.
All five point sps have now been worked.
To finish the last side:
- Dc in each of the next 2 dc.
- Sk the next 2 dc at the valley.
- Dc in each of the next 2 dc.
- Join with a sl st in the top of the starting ch 3.
Count: 40 dc and 5 ch-2 sps.
Each point now has 4 dc on each side.
Round 4
Sl st in the next dc. Sl st into the first ch-2 sp.
Work the starting point group.
Then:
- Dc in each of the next 3 dc.
- Sk the next 2 dc at the valley.
- Dc in each of the next 3 dc.
- Work a point group in the next ch-2 sp.
Rep Steps 1–4 three more times.
Finish the last side:
- Dc in each of the next 3 dc.
- Sk the next 2 dc.
- Dc in each of the next 3 dc.
- Join with a sl st in the top of the starting ch 3.
Count: 50 dc and 5 ch-2 sps.
Each point now has 5 dc on each side.
Rounds 5–36: Grow the Blanket
Work each new rnd like this:
- Sl st in the next dc. Sl st into the first ch-2 sp.
- Work the starting point group.
- Dc in each st down the side. Stop when 1 dc is left before the valley.
- Sk that dc. Sk the first dc on the next side.
- Dc in each st up the next side. Stop at the ch-2 sp.
- Work a point group in that sp.
- Rep Steps 3–6 until all five point sps are done.
- Work Steps 3–5 once more to reach the start of the rnd.
- Join with a sl st in the top of the starting ch 3.
Each new rnd adds 10 dc. Each side of a point gains 1 dc.
To find the plain dc count for each slope, use the round number minus 1. Work these dc between the point group and the valley skip.
For example, on Rnd 5, work 4 dc down the slope. Sk 2 dc. Work 4 dc up the next slope.
Stitch Count Guide
The counts below include the starting ch 3 but exclude the ch-2 sps.
| Round | Total dc | Dc on each side of a point |
|---|---|---|
| 2 | 30 | 3 |
| 3 | 40 | 4 |
| 4 | 50 | 5 |
| 5 | 60 | 6 |
| 6 | 70 | 7 |
| 12 | 130 | 13 |
| 18 | 190 | 19 |
| 24 | 250 | 25 |
| 30 | 310 | 31 |
| 36 | 370 | 37 |
There should always be 5 ch-2 point sps.
Changing Colors
For a color change at the end of a rnd:
- Complete the last dc with the current color.
- Insert the hook into the top of the starting ch 3.
- Draw the new color through the stitch and the loop on the hook to make the joining sl st.
- Cut the old color, leaving a tail to weave in.
- Use the new color for the positioning sl sts and the next rnd.
Keep the join snug without pulling it tight.
Border
This border follows the star shape.
After the last main rnd, sl st in the next dc, then sl st into the point sp.
Ch 1. This does not count as a st.
Work (1 sc, ch 2, 1 sc) in the same point sp.
Then:
- Sc in each dc until 1 dc remains before the valley.
- Sk the next 2 dc at the valley.
- Sc in each dc up to the next point sp.
- Work (1 sc, ch 2, 1 sc) in that sp.
Rep Steps 1–4 three more times.
Work Steps 1–3 once more across the last section. Join with a sl st in the first sc.
Fasten off.
Finishing
- Weave all yarn tails through the backs of the sts.
- Change direction as you weave to help hold each tail in place.
- Lay the blanket flat.
- Gently shape the five points and the dips between them.
- Block only as allowed by the yarn label.
- Let the blanket dry fully before folding it.
Adjust the Size
For a smaller blanket, stop after an earlier full rnd.
For a larger blanket, keep working the repeat. Add 1 plain dc to each slope on every new rnd. Keep the same point groups and valley skips.
Measure across the widest part while the blanket lies flat. Stop when it reaches the size you want, then add the border.
Tips for an Even Shape
- If the edge begins to wave, check for extra dc or a missed valley skip.
- If the blanket cups, check for missed sts or extra skips.
- Keep the ch-2 point spaces loose enough to hold the next point group.
- Do not pull the stitches beside each valley too tight.
- Check the blanket on a flat surface every few rounds.