Pattern Description:
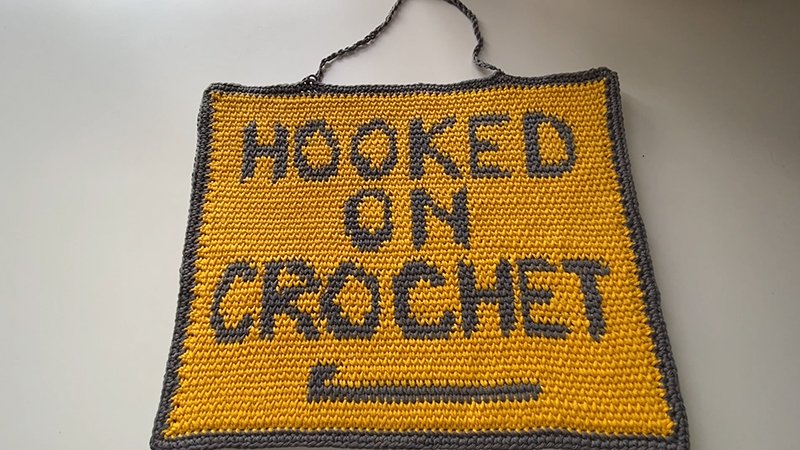
The Hooked on Crochet Wall Hanging is a bold, modern décor piece that proudly celebrates your love for the craft.
Worked in tapestry crochet with the waistcoat stitch, it forms crisp lettering and a charming hook motif with a knit-look texture.
This stash-friendly project is simple to stitch, relaxing to follow, and adaptable in size, perfect for brightening craft rooms, studios, or creative corners.
Materials Needed & Measurements:
Materials Needed
- Yarn: Approximately 200 yards of Color A (background color, e.g., yellow) and 100 yards of Color B (lettering color, e.g., gray).
- Example yarn used in the tutorial: Paint Box Yarns Cotton Aaron (Category four weight yarn, 50g skeins containing 93 yards/85m).
- Crochet Hook:
- For the sport weight version: 3mm hook.
- For the Category four weight version (used in the tutorial): 5mm hook.
- Notions: Tapestry needle, scissors, and a stitch marker.
- Hanging/Finishing: Extras for hanging, such as cardboard for backing and yarn for creating a chain hanger. The finished item can also be framed or used as a placemat.
Measurements
- The finished size depends on the yarn weight used.
- The sport weight version (using Shakamaya Katana) measures 9 inches by 11.5 inches.
- Note that tension and gauge are not essential, but the fabric should be dense enough for the letters to stand out, yet loose enough to easily get the hook through.
Instructions for Making the Hooked on Crochet Wall Hanging Pattern:
Starting the Foundation and Gauge
Begin the project using Yarn A (the background color). While tension and gauge are not essential, the resulting fabric should be dense enough for the lettering to stand out but loose enough to easily push the hook through.
- Chains: Start with a slip knot and chain 61 chains. Do not make the chain too loose, as the tight nature of the waistcoat stitch can cause a loose foundation to “bag out”.
- Row 1 (Foundation Row): Work a single crochet (sc) in the second chain from the hook and in each chain across. Working into the back bumps is optional. You should have 60 single crochets.
Establishing the Waistcoat Stitch (Rows 2-4)
Row 2 marks the start of the waistcoat stitch (WCS), which creates a knit-like effect.
- Row 2: Chain one (ch 1) and work a normal single crochet in the first stitch. (Note: You always single crochet in the first and last stitch of every row).
- Waistcoat Stitch Technique: For the remainder of the row, work the WCS. Instead of inserting the hook into the top of the stitch (through the two top bars), insert the hook between the two vertical legs of the V below. You may need to look to the other side to confirm the hook comes out between the V.
- Tension Control: When completing the stitch, yarn over and pull the loop through, making sure to pull the loop up to the full height of the row. This is critical, as failure to do so results in a very tight fabric.
- Row Completion: Continue the WCS across, ending with a normal single crochet in the very last stitch. The WCS is often trickiest on Row 2 because you are working into single crochets, not into previous WCS stitches.
- Rows 3 and 4: Turn, chain one, single crochet in the first stitch, and continue with the WCS across, working into the more pronounced V shapes created by Row 2. Finish with a single crochet in the last stitch.
Implementing Tapestry Crochet and Color Changes
Starting on Row 5, you will begin working with Yarn B (the lettering color) to create the design.
- Yarn Carrying: It is essential to remember that even-numbered rows (Row 6, 8, etc.) are right side (RS) rows, and odd-numbered rows (Row 5, 7, etc.) are wrong side (WS) rows. When carrying unused yarn, always carry it along the wrong side of the work.
- Row 5 (WS Row): Chain one, single crochet in the first stitch. Work the first 16 WCS using Yarn A.
- The Color Change: The color change is executed on the final yarn over of the previous stitch.
- Start the 16th stitch with Yarn A, but before the final pull-through, bring Yarn A to the front (the WS).
- Grab Yarn B and pull it through the remaining loops to complete the stitch in the new color. Keep the tail end of Yarn B on the wrong side.
- Carrying Yarn: Using Yarn B, work the next 29 WCS, ensuring you enclose and carry Yarn A along the wrong side of the work within the stitches. This keeps Yarn A ready for when you need to switch back.
- Switching Back: On the 29th stitch of Yarn B, stop before the final yarn over. Ensure Yarn B is left on the wrong side, pull up Yarn A, and complete the stitch.
- Finishing the Row: Finish the row with the remaining WCS in Yarn A, followed by a normal single crochet in the last stitch. Leave Yarn B where you finished it, as you will need it when you return to that point on the next row.
- Continuing the Pattern (Row 6 Example): Row 6 starts with 13 WCS in Yarn A. When changing to Yarn B, you must enclose Yarn A in the back (the RS for this row).
Adding the Border and Finishing
Once the main tapestry panel is completed, the border is added using Yarn B. Note that the panel may be slightly misshapen, but blocking will even it out.
- Round 1: Join Yarn B (with the right side facing). Chain one and work a single crochet (sc) border around the entire edge.
- Work sc across the top edge. When reaching a corner, chain one.
- Work down the row ends, placing one sc into each row end. Chain one at the next corner.
- Work sc across the foundation row. Chain one at the final corner.
- Work sc back up the fourth side. Slip stitch (sl st) into the first stitch to join.
- Round 2: Chain one. Work sc into every stitch. When you reach the chain-one corner space, work single crochet, chain one, single crochet (SC, ch 1, SC) all into that same space. Slip stitch to join at the end.
- Finalizing: Block the wall hanging. Stick the finished piece onto a backing, such as plain cardboard, taking care not to stretch the edges and ensuring they are level. For a hanger, create a long chain (using yarn) and sew it onto the top of the wall hanging.