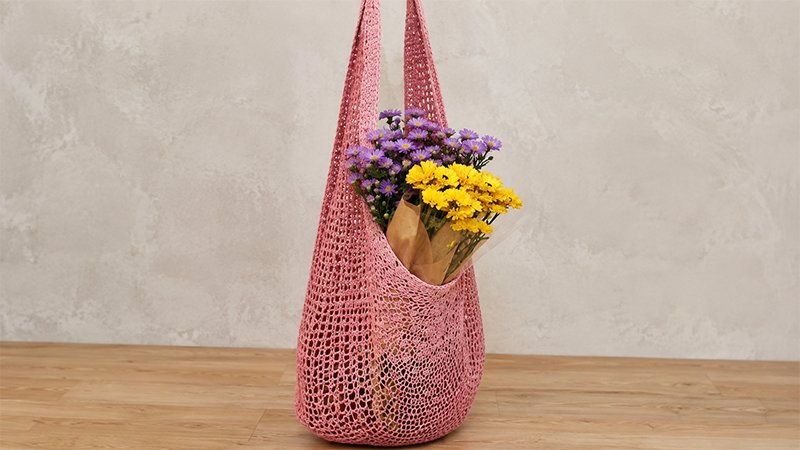
An airy, structural tote designed for everyday errands, this semi-circular crochet market bag balances elegance with practical durability.
Crafted from lightweight fingering-weight cotton yarn, the flexible mesh body expands generously to accommodate fresh produce, flowers, or beach essentials, yet folds down compactly for effortless storage.
Utilizing a strategic sequence of expanding and contracting rows punctuated by textured puff stitches, the design achieves a soft, draped silhouette that rests comfortably over the shoulder.
It serves as a stylish, reusable alternative to single-use bags, offering a customizable, eco-friendly accessory tailored for effortless city strolls or trips to the local market.
Pattern Specifications
-
Skill Level: Advanced Beginner to Intermediate
-
Finished Dimensions: 30 inches wide before handles (24 inches wide with handles attached); 13 inches long semi-circle depth
-
Gauge: 26 stitches = 4 inches
-
Materials Needed:
-
Approx. 500 yards fingering-weight (#2 fine) cotton yarn cake
-
Size H (5.0 mm) crochet hook
-
Yarn needle
-
Scissors
-
Pattern Notes & Abbreviations
-
CH: Chain
-
DC: Double Crochet
-
DC2Tog: Double Crochet Two Together (Decrease)
-
PS: Puff Stitch
-
SC: Single Crochet
-
SL ST: Slip Stitch
-
ST(s): Stitch(es)
-
Construction: The bag is worked top-down as a semi-circle, expanding by 8 stitches per row through Row 25, then contracting by 8 stitches per row through Row 49.
-
Sizing Adjustments: To make a smaller bag, halt the increasing section early and begin the decreasing sequence.
Special Stitch Instructions
-
Puff Stitch (PS): Yarn over, insert hook into designated stitch, yarn over and pull up a loop (3 loops on hook). Repeat this action three more times into the exact same stitch until 9 loops remain on the hook. Yarn over, pull through all 9 loops, then chain 1 to secure the stitch.
-
Double Crochet Two Together (DC2Tog): Yarn over, insert hook into next stitch, yarn over and pull up a loop (3 loops on hook). Yarn over and pull through 2 loops (2 loops remain). Yarn over, insert hook into the following stitch, yarn over and pull up a loop (4 loops on hook). Yarn over and pull through 2 loops (3 loops remain). Yarn over and pull through all 3 remaining loops.
Step-by-Step Crochet Directions
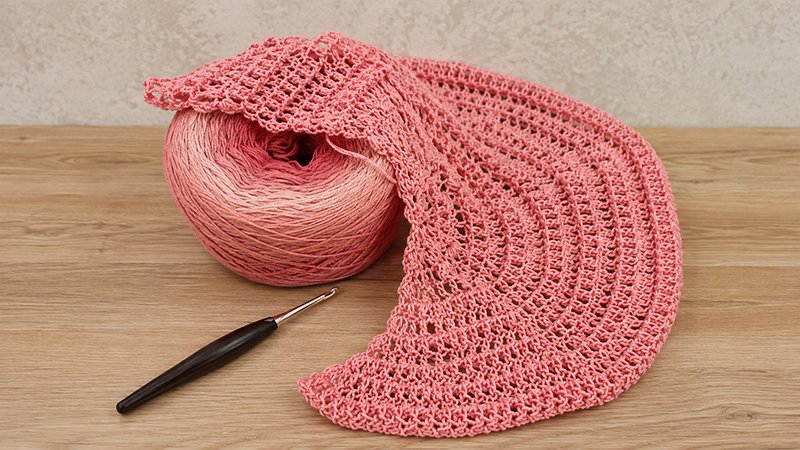
Foundation & Setup
CH 4, SL ST into the first chain to form a center ring (or use a Magic Ring).
Expansion Section (Increasing Rows)
-
Row 1: CH 3 (counts as 1 DC throughout), work 7 DC into the ring. Turn. (8 STs)
-
Row 2: CH 3, 1 DC in same ST, work 2 DC into each remaining ST across. Turn. (16 STs)
-
Row 3: CH 3, PS in same ST, 1 DC in next ST. [1 DC and 1 PS in next ST, 1 DC in next ST]. Repeat sequence between [ ] across to end. Turn. (24 STs)
-
Rows 4–25: Continue expanding the body by adding 1 additional DC into the spacing between the puff stitch increases on every row. For each row, CH 3, work 1 PS in same ST, DC across the designated interval, then repeat the increase grouping [1 DC + 1 PS in next ST, followed by the row’s specified DC count] across. Turn.
-
Row 4: DC in next 2 STs between increases. (32 STs)
-
Row 5: DC in next 3 STs between increases. (40 STs)
-
Row 6: DC in next 4 STs between increases. (48 STs)
-
Row 7: DC in next 5 STs between increases. (56 STs)
-
Row 8: DC in next 6 STs between increases. (64 STs)
-
Row 9: DC in next 7 STs between increases. (72 STs)
-
Row 10: DC in next 8 STs between increases. (80 STs)
-
Row 11: DC in next 9 STs between increases. (88 STs)
-
Row 12: DC in next 10 STs between increases. (96 STs)
-
Row 13: DC in next 11 STs between increases. (104 STs)
-
Row 14: DC in next 12 STs between increases. (112 STs)
-
Row 15: DC in next 13 STs between increases. (120 STs)
-
Row 16: DC in next 14 STs between increases. (128 STs)
-
Row 17: DC in next 15 STs between increases. (136 STs)
-
Row 18: DC in next 16 STs between increases. (144 STs)
-
Row 19: DC in next 17 STs between increases. (152 STs)
-
Row 20: DC in next 18 STs between increases. (160 STs)
-
Row 21: DC in next 19 STs between increases. (168 STs)
-
Row 22: DC in next 20 STs between increases. (176 STs)
-
Row 23: DC in next 21 STs between increases. (184 STs)
-
Row 24: DC in next 22 STs between increases. (192 STs)
-
Row 25: DC in next 23 STs between increases. Turn. (200 STs)
-
Contraction Section (Decreasing Rows)
Note: Working two consecutive DC2Tog stitches offsets the added stitch from the puff grouping, allowing the net stitch count to decrease by 8 overall per row.
-
Row 26: CH 3, PS in same ST, work 2 consecutive DC2Tog, DC in next 18 STs. [1 DC and 1 PS in next ST, 2 consecutive DC2Tog, DC in next 18 STs]. Repeat sequence between [ ] across. Turn. (192 STs)
-
Rows 27–43: Continue decreasing by reducing the plain DC count between the decrease clusters by 1 ST on every row.
-
Row 27: DC in next 17 STs between repeat clusters. (184 STs)
-
Row 28: DC in next 16 STs between repeat clusters. (176 STs)
-
Row 29: DC in next 15 STs between repeat clusters. (168 STs)
-
Row 30: DC in next 14 STs between repeat clusters. (160 STs)
-
Row 31: DC in next 13 STs between repeat clusters. (152 STs)
-
Row 32: DC in next 12 STs between repeat clusters. (144 STs)
-
Row 33: DC in next 11 STs between repeat clusters. (136 STs)
-
Row 34: DC in next 10 STs between repeat clusters. (128 STs)
-
Row 35: DC in next 9 STs between repeat clusters. (120 STs)
-
Row 36: DC in next 8 STs between repeat clusters. (112 STs)
-
Row 37: DC in next 7 STs between repeat clusters. (104 STs)
-
Row 38: DC in next 6 STs between repeat clusters. (96 STs)
-
Row 39: DC in next 5 STs between repeat clusters. (88 STs)
-
Row 40: DC in next 4 STs between repeat clusters. (80 STs)
-
Row 41: DC in next 3 STs between repeat clusters. (72 STs)
-
Row 42: DC in next 2 STs between repeat clusters. (64 STs)
-
Row 43: DC in next 1 ST between repeat clusters. (56 STs)
-
-
Row 44: CH 3, PS in same ST, 2 consecutive DC2Tog. [1 DC and 1 PS in next ST, 2 consecutive DC2Tog]. Repeat sequence between [ ] across. Turn. (48 STs)
-
Row 45: CH 3, PS in same ST, 1 DC2Tog, 1 DC in next ST. [1 DC and 1 PS in next ST, 1 DC2Tog, 1 DC in next ST]. Repeat sequence between [ ] across. Turn. (40 STs)
-
Row 46: CH 3, PS in same ST, 1 DC2Tog. [1 DC and 1 PS in next ST, 1 DC2Tog]. Repeat sequence between [ ] across. Turn. (32 STs)
-
Row 47: CH 3, PS in same ST, 1 DC. [1 DC and 1 PS in next ST, 1 DC]. Repeat sequence between [ ] across. Turn. (24 STs)
-
Row 48: CH 3, DC2Tog across 15 times. Turn. (16 STs)
-
Row 49: CH 3, work 7 consecutive DC2Tog while holding all final loops on the hook. Yarn over, draw through all loops, chain 1 to secure. Cut yarn leaving a long tail, knot securely, and weave through the center to close. (8 STs)
Handles & Finishing
-
Lay the mesh bag flat to locate the midpoints on each edge.
-
Join yarn near the center point, leaving a generous tail for reinforcing the stress points.
-
Row 1: Work 5 SC evenly across the central border area, CH 1, turn.
-
Rows 2–15: Work 1 SC into each stitch across, CH 1, turn (5 STs per row). Adjust row count for custom strap lengths.
-
Secure the strap end to the opposite side of the bag rim.
-
Fasten off, knot firmly, weave in all loose ends using a tapestry needle, and trim excess yarn.