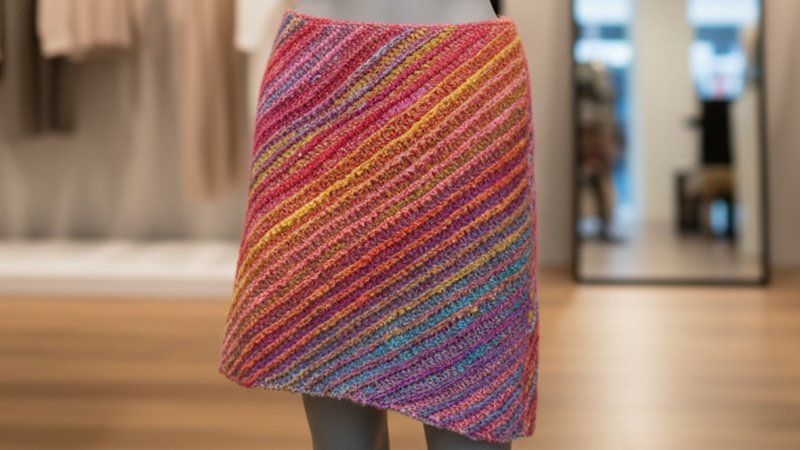
Pattern Description:
This Slanted Skirt pattern uses slanted crochet to accommodate the body’s curves, eliminating the need for traditional hip shaping. It is worked in rows, from side to side, resulting in a pencil skirt shape.
The finished fabric features diagonal ribs, which help ensure a good fit. The construction works with any stitch that stretches vertically.
Materials Needed & Measurements:
Materials Needed
- Yarn: Durable yarn such as rayon/cotton/linen blends, sock yarn, or cotton-based sock yarn. Use multiple strands if the yarn is too thin.
- Hooks: Multiple hook sizes for swatching. Larger hooks may be needed for slip stitch ribbing.
- Stitches (any vertically stretchy stitch):
- Back-loop single crochet (blo sc)
- Back-loop slip stitch (blo slst)
- Double crochet worked in the back loop + horizontal bar
- Closure: Chain cord to thread through the waistband.
- Tools: Hooks for swatching, 30-stitch swatch, non-stretch string for circumference, pins for marking gauge.
- Underskirt (optional): Add if fabric is see-through.
Measurements Needed
- Length: From waist/hips to desired hemline.
- Widest Circumference: Largest body point the skirt must pass over, measured using a non-stretch string loop.
Abbreviations Used
- st – stitch
- sts – stitches
- sc – single crochet
- blo sc – back-loop-only single crochet
- slst – slip stitch
- blo slst – back-loop-only slip stitch
- dc – double crochet
- tog. – together (as in “2 sts tog.”)
- ch – chain
- Row 1, Row 2 – row numbers
Instructions for Making the Slanted Skirt Pattern:
Step 1: Choose a Yarn
Select a durable yarn, as the skirt will endure significant wear and tear. If the yarn is too flimsy, take two or more strands together. Choose yarn based on the desired occasion, such as light yarn for summer or warm yarn for winter.
Step 2: Choose a Stitch (st)
This construction works with any st that stretches vertically.
Create a nice ribbing are:
- blo sc (single crochet into the back loop only).
- blo slst (slip stitch into the back loop only).
- dc (double crochet) worked into the back loop and the horizontal bar beneath.
Step 3: Make a Swatch
Gather a collection of hooks and swatch to achieve a stretchy fabric that is not see-through (an underskirt can be sewn in if necessary).
For sc and dc sts, start close to the yarn’s suggested hook size. For slsts, be prepared to use a way larger hook, as personal tension highly influences the required size.
To make the swatch, follow the instructions for Step 6, using around 30 sts. Measure the gauge only from the portion worked with the hook you intend to use.
Step 4: Take a Measure
You need two measurements:
- Length: Measure from where the skirt sits (waist or hips) down to the desired end. If the finished skirt is considerably longer than slightly above the knees, plan for a slit or increases.
- Widest Circumference: Determine the widest point the skirt must cover (hips and thighs). Use a non-stretchy string, tie it into a loop, and adjust the loop until it is “just possible” to put it up to your waist. Measure the length of this loop.
Step 5: Do the Math
Stretch your swatch as the finished skirt will be stretched on you. Place the swatch so the slant runs from lower left to top right, with row ends at the top and bottom.
Place pins to measure a 10 cm square:
- Place two pins 10 cm apart, parallel to the bottom edge.
- Place a third pin 10 cm up from the right pin.
- Row Count: Count the rows between the first two pins (along the red line in the photo). This gives rows per 10 cm.
- Stitch Count: Count the sts from the third pin down to the height of the first two (along the yellow line in the photo). This gives sts per 10 cm of height.
- Calculate Skirt: Use these counts with your measurements.
- Total Rows = (Widest Circumference in cm / 10) x Row Count.
- Starting sts = (Length in cm / 10) x Stitch Count.
- Note: For a 1m (100cm) circumference and 60cm length, with a gauge of 16 rows/10cm and 24 sts/10cm, you would start with 160 rows and 144 sts.
Step 6: Crochet Away
Make the calculated number of chains, plus one (e.g., 145 chains). Work the following in your chosen stretchy rib st.
- Turning Chains Note: Use one more turning chain than you think you need to ensure the sides of the parallelogram do not end up too tight. For slsts, chain 1. For sc, chain 2.
- Row 1: st all.
- Row 2: Work 2 sts tog., st to end, st 1 into the turning chain of the previous row.
Repeat Rows 1 and 2 until you reach the total number of rows calculated in Step 5, ending with a Row 1.
Step 6a: Try and Tweak
When the edge is long enough to fit around your hips, provisionally close the skirt (e.g., by joining the beginning chain to the current row with a tie) and try it on. If the fit is perfect, proceed to Step 6b. If it is too tight or too short, add more rows; less stretching will result in a longer skirt.
Step 6b: Closing
The skirt is now a parallelogram. Close it by joining the beginning chain (Side A) to the last row (Side B). Decide on the outside and close the seam on the inside, using sewing or slst. To avoid a jog, work 2 sts into one at both ends, switching the parts to align with the parallelogram.
Step 6c: Finishing
Break yarn and sew in ends. Make a chain of chains and thread it through the top of the skirt to serve as a closure.
Optional Variation: Straight Top
If you desire a smaller waist, work the top rows straight by slightly adjusting Row 2 in
Step 6: Work five sts, work 2 sts tog., st to end, st 1 into the turning chain of the previous row.