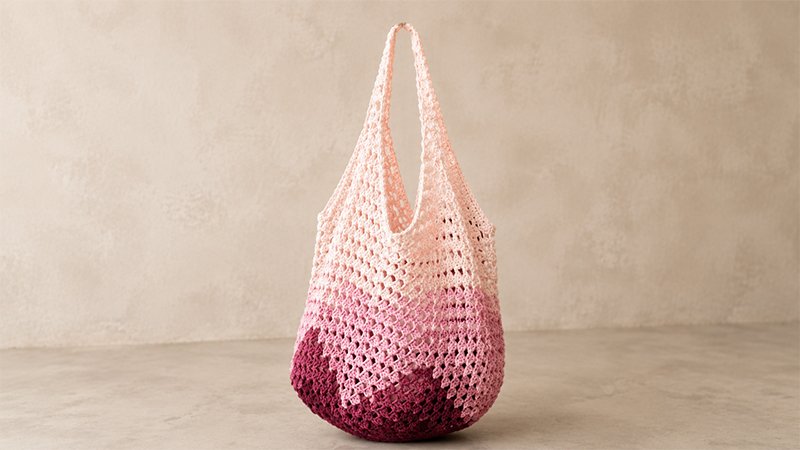
Crafting your own reusable tote combines practical sustainability with classic handmade charm.
The granny stitch market bag is a functional, eco-friendly project that transforms basic yarn into a sturdy, expandable carryall for daily errands or farm-stand trips.
Utilizing a textured cluster design, this bag builds outward from a solid base before shaping into raised sides that naturally stretch to hold produce and everyday essentials.
Whether you are aiming to reduce single-use plastics or looking for a customizable stash-buster project, this tutorial guides you step-by-step through materials, sizing adjustments, stitch logic, and final construction.
Project Overview & Specs
-
Skill Level: Easy / Intermediate
-
Finished Dimensions: ~31 cm wide × 32 cm high (excluding straps)
-
Design Structure: Worked in the round from the bottom base upward, incorporating continuous corner increases and center-edge decreases to form a contoured basket shape.
Materials & Tools
-
Yarn: ~200 grams of Sport / Lightweight (Category 3) 100% Cotton Yarn.
-
Note: Cotton provides minimal stretch and high strength under weight.
-
-
Crochet Hook: 3.5 mm (or size needed to meet desired fabric density)
-
Notions: 4 stitch markers, tapestry needle, scissors
Yarn Substitution Alternatives:
If using a different brand or fiber, select a sturdy, non-mercerized or low-stretch cotton. Adjust hook size accordingly to maintain a firm fabric:
-
Option A: Lion Brand Pima Cotton (100g / 170m)
-
Option B: Lion Brand 24/7 Cotton DK (100g / 250m)
-
Option C: Paintbox Yarns Cotton DK (50g / 125m)
Key Abbreviations (US Terminology)
-
ch / chs: chain / chains
-
sc: single crochet
-
dc: double crochet
-
sl st: slip stitch
-
sp / sps: space / spaces
-
st / sts: stitch / stitches
-
CL (Cluster / Granny Group): 3 double crochet stitches worked into the same space/chain-gap.
-
dc3tog (Decrease): Double crochet 3 together across designated chain spaces and stitches to decrease width.
Special Stitch Definitions
Double Crochet Cluster (CL) Work 3 full double crochets into the designated chain space or gap.
Dec-Cluster 1 (dc3tog – Round 14 Decrease)
-
Yarn over, insert hook in the chain-1 space preceding the center marker, yarn over and pull up a loop, yarn over and draw through 2 loops (2 loops on hook).
-
Yarn over, insert hook into the middle double crochet of the center cluster stitch, yarn over and pull up a loop, yarn over and draw through 2 loops (3 loops on hook).
-
Yarn over, insert hook in the next chain-1 space following the center cluster, yarn over and pull up a loop, yarn over and draw through 2 loops (4 loops on hook).
-
Yarn over and pull through all 4 loops on the hook to complete the decrease.
Dec-Cluster 2 (dc3tog – Round 15+ Decrease)
-
Yarn over, insert hook into the chain-1 space before the previous decrease, yarn over and pull up a loop, yarn over and draw through 2 loops (2 loops on hook).
- Yarn over, insert hook directly into the top of the dc3tog stitch from the previous round, yarn over and pull up a loop, yarn over and draw through 2 loops (3 loops on hook).
-
Yarn over, insert hook into the next chain-1 space, yarn over and pull up a loop, yarn over and draw through 2 loops (4 loops on hook).
-
Yarn over and pull through all 4 loops on the hook.
Color Palette Guide (Optional Color Blocks)
-
Rounds 1–8: Dark Navy
-
Rounds 9–12: Medium Denim Blue
-
Rounds 13–15: Neutral Grey
-
Rounds 16–18: Light Denim Blue
-
Rounds 19–21: Soft Light Blue
-
Rounds 22–24: Soft Light Grey
-
Rounds 25–27: Ice Blue
Pattern Instructions
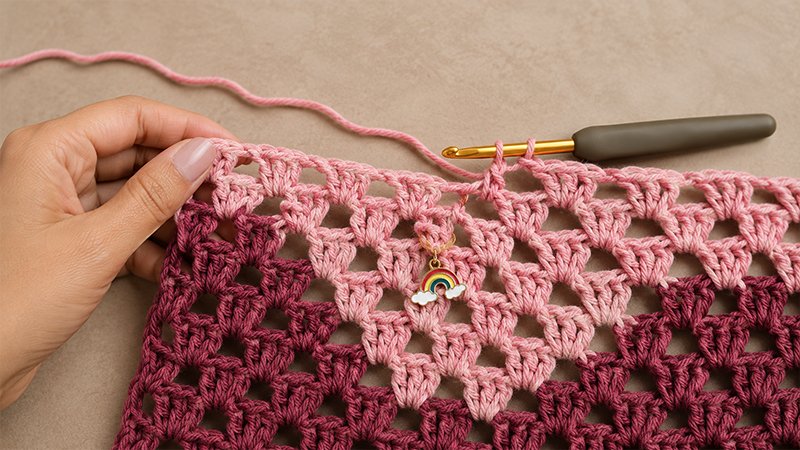
Step 1: Base Expansion
-
Round 1: Form a magic ring (or ch 4, sl st to first ch to form a loop). Ch 3 (counts as 1 dc), 2 dc into ring, ch 3, [1 CL into ring, ch 3] 3 times. Sl st to top of beg ch-3 to join. (4 corner spaces, 4 CL groups)
-
Round 2: Sl st across to the first corner ch-3 sp. (Ch 3, 2 dc, ch 3, 1 CL) into corner sp. *Ch 1, skip 3 sts, (1 CL, ch 3, 1 CL) into next corner sp; rep from * 2 more times, ch 1, sl st to top of beg ch-3 to join. (4 corners, 8 CL groups)
-
Round 3: Sl st to corner sp. (Ch 3, 2 dc, ch 3, 1 CL) in corner sp. *Ch 1, skip 3 sts, 1 CL in next ch-1 sp, ch 1, skip 3 sts, (1 CL, ch 3, 1 CL) in corner sp; rep from * 2 more times, ch 1, 1 CL in final ch-1 sp, ch 1, sl st to top of beg ch-3 to join. (4 corners, 12 CL groups)
-
Round 4: Sl st to corner sp. (Ch 3, 2 dc, ch 3, 1 CL) in corner sp. *[Ch 1, skip 3 sts, 1 CL in next ch-1 sp] across to next corner, ch 1, (1 CL, ch 3, 1 CL) in corner sp; rep from * around, ending with ch 1, sl st to top of beg ch-3. (4 corners, 16 CL groups)
-
Rounds 5–13: Repeat Round 4 continuously. Each round adds 4 cluster groups total (1 per side). At the end of Round 13, you should have 52 total CL groups (13 per side).
Marking Step: Count 6 CL groups from each corner on all 4 sides. Place a stitch marker into the 7th (middle) CL group of each side.
Step 2: Body Shaping (Creating Side Walls)
-
Round 14: Sl st to corner sp. (Ch 3, 2 dc, ch 3, 1 CL) in corner sp. *Work [ch 1, 1 CL in next ch-1 sp] 4 times. Execute Dec-Cluster 1 over the next ch-1 sp, the marked middle cluster st, and the following ch-1 sp. Work [ch 1, 1 CL in next ch-1 sp] 4 times, ch 1, (1 CL, ch 3, 1 CL) in corner sp; rep from * around, ending last sequence with sl st to top of beg ch-3.
-
Round 15: Sl st to corner sp. (Ch 3, 2 dc, ch 3, 1 CL) in corner sp. *Work [ch 1, 1 CL in next ch-1 sp] 4 times. Execute Dec-Cluster 2 over the preceding ch-1 sp, the previous round’s
dc3togstitch, and the next ch-1 sp. Work [ch 1, 1 CL in next ch-1 sp] 4 times, ch 1, (1 CL, ch 3, 1 CL) in corner sp; rep from * around, sl st to top of beg ch-3. -
Rounds 16–27: Repeat Round 15 for 12 additional rounds. The center decreases will draw the edges inward while corners point upward.
-
Round 28 (Border): Sl st to corner sp. Ch 1, (2 sc, ch 2, 2 sc) in corner sp. Work 1 sc in every st and every ch-1 sp along each edge, placing (2 sc, ch 2, 2 sc) in each corner sp. Sl st to first sc to join. Fasten off and weave in ends.
Step 3: Strap Extensions & Assembly
Straps are worked as 4 separate pointed panels directly from the corner spaces of Round 27 (ignore Round 28 for strap attachment points).
Individual Extension Panel (Make 4):
-
Row 1: Join yarn in the ch-1 space immediately preceding any corner on Round 27. Ch 4 (counts as 1 dc + ch 1), skip 3 sts, (3 dc, ch 3, 3 dc) into the corner sp, ch 1, skip 3 sts, 1 dc into the next ch-1 sp. Turn.
-
Row 2: Ch 4, skip the ch-1 sp and 3 sts, (3 dc, ch 3, 3 dc) into the corner ch-3 sp, ch 1, 1 dc into the 3rd chain of the turning ch-4 from the previous row. Turn.
-
Rows 3–7 (or desired half-length): Repeat Row 2 until the extension reaches half your preferred overall strap length.
-
Strap Peak Row: Ch 4, skip all double crochet stitches, work 1 sc into the tip ch-3 corner sp, ch 4, sl st into the top of the outer dc st. Fasten off, leaving a tail for joining.
Strap Joining & Finishing
-
Align the extensions from adjacent corners so they meet to form two continuous shoulder handles.
-
Turn the bag inside out (wrong side facing).
-
Using a tapestry needle or single crochet joins, seam matching strap ends securely across their flat edges.
-
Fasten off, weave in all remaining loose yarn ends securely, and turn the bag right-side out.