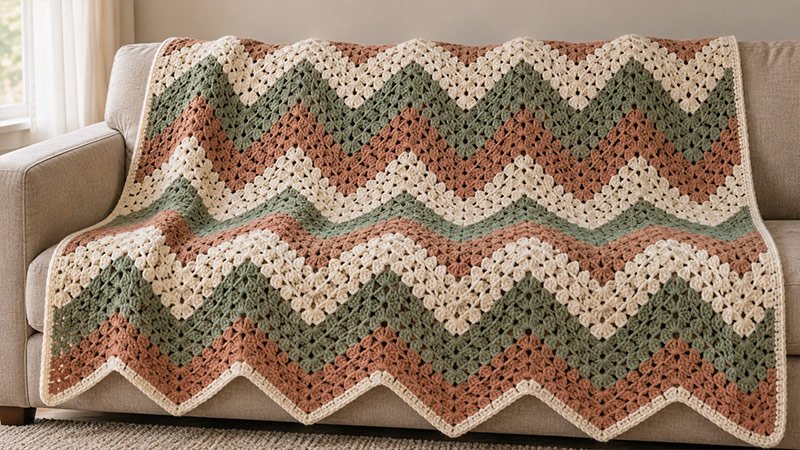
This blanket uses groups of three double crochet stitches. The groups form rows of zigzags. Small gaps between them give the cloth a light feel. Extra groups make each peak. Skipped spaces form the dips. These traits are common in granny ripple crochet.
This version has six zigzag repeats. It uses stripes of cream, sage, and clay. Work the blanket flat. Then add a plain trim to both side edges. Keep the zigzag shape at the top and bottom.
Pattern Details
Skill Level
Confident beginner
You should know how to chain, work double crochet, find spaces between stitch groups, and change colors.
- Terms: US crochet terms.
- Construction: Worked flat in turned rows.
- Main repeat: One row after the setup row.
- Width: Six zigzag repeats.
- Length: 108 rows.
Size
Target finished size: About 42 × 54 inches.
This size assumes that:
- Each full zigzag repeat measures about 7 inches wide.
- 8 rows measure about 4 inches tall.
Measure the blanket flat without stretching. Measure its length from a point on the lower edge to the matching point on the upper edge.
Materials
- About 1,800–2,200 yards of worsted-weight yarn, Category 4.
- Suggested yarn split:
- Color A — Cream: About 700–850 yards, including the side trim.
- Color B — Sage: About 550–675 yards.
- Color C — Clay: About 550–675 yards.
- 5.5 mm crochet hook, or a size that gives the target gauge.
- Yarn needle.
- Scissors.
- Tape measure.
- Stitch markers.
Use yarns with the same weight and similar care needs.
Abbreviations
| Abbreviation | Meaning |
|---|---|
| ch | Chain |
| dc | Double crochet |
| sc | Single crochet |
| st / sts | Stitch / stitches |
| sp / sps | Space / spaces |
| sk | Skip |
| rep | Repeat |
| RS | Right side |
| WS | Wrong side |
| GC | Granny cluster: 3 dc in the same ch or sp |
Gauge
Target gauge in the zigzag granny stitch:
- One full zigzag repeat = about 7 inches wide.
- Eight rows = about 4 inches tall.
Check gauge after washing and drying the swatch as directed on the yarn label.
Make a Gauge Swatch
- With A, ch 39.
- Work Row 1 below. Make two peaks in place of six.
- Work Row 2 until the swatch has 10 rows.
- Fasten off. Weave in the ends.
- Wash, shape, and dry the swatch.
- Check the width of the swatch. Divide it by 2. This gives the width of one repeat.
- Check the height of eight rows. Measure through the center of the fabric.
Swatch count per row: 12 GC, 2 edge dc, and 2 peak ch-2 sps.
If the swatch is too wide, use a smaller hook. If it is too narrow, use a larger hook. Check both the drape and the size.
How to Adjust the Size
Change the Width
Use this foundation formula:
Starting chain = (18 × number of zigzag repeats) + 3
At the target gauge:
| Zigzag repeats | Starting chain | Approximate width before side trim |
|---|---|---|
| 4 | 75 | 28 inches |
| 5 | 93 | 35 inches |
| 6 | 111 | 42 inches |
| 7 | 129 | 49 inches |
| 8 | 147 | 56 inches |
For a custom width:
- Measure one full repeat in your swatch.
- Divide your desired width by that measurement.
- Round to a whole number of repeats.
- Multiply that number by 18.
- Add 3 for the starting chain.
The narrow side trim adds a small amount to the width.
Change the Length
At the target gauge, two rows add about 1 inch.
- Add 6 rows for about 3 more inches.
- Remove 6 rows to shorten the blanket by about 3 inches.
- Use full six-row stripes if you want all stripes to have the same depth.
Use your own row gauge if it differs from the target. Allow more yarn for a larger blanket.
Pattern Notes
- Turn at the end of each main row.
- The first ch 3 counts as one edge dc.
- In Row 1, work GC into the chains shown.
- From Row 2 on, work GC in the gaps between groups.
- Do not add chains between GC.
- Work ch 2 only at each peak.
- Work (GC, ch 2, GC) at each peak.
- Skip the gap at each valley.
- Skip the first gap next to the starting edge dc.
- Leave the last gap next to the ending edge dc unworked.
- Each full blanket row has 36 GC and 2 edge dc.
- Each row has 6 peak ch-2 sps and 5 valleys.
- Change shades on the last pull-through of the last dc.
- Leave an 8-inch tail when you join or cut yarn.
- Choose the face you like best. Mark it as the RS before you add the side trim.
Stitch Explanations
Granny Cluster — GC
Work 3 dc in the same ch or sp.
These are three complete stitches. Do not join their tops together.
Peak
Work (3 dc, ch 2, 3 dc) in the same ch or ch-2 sp.
The ch-2 sp marks the top of the zigzag.
Valley
In Row 1, sk 5 ch between the groups on either side of the dip.
In later rows, skip the gap between those two groups. Work the next GC into the first gap on the rising side of the next zigzag.
Pattern Instructions
Foundation Chain
With A, ch 111 loosely.
If the chain feels tight, use a larger hook for the chain only. Return to your main hook for Row 1.
Row 1 — Form the Zigzags
The first 3 ch nearest the slip knot end of the row’s starting edge will act as the starting edge dc; the instructions below leave the first five chains from the hook unworked before the first GC.
- Work GC in the sixth ch from the hook.
- Sk 2 ch. Work GC in the next ch.
- Sk 2 ch. Work (GC, ch 2, GC) in the next ch. This forms the first peak.
- Sk 2 ch. Work GC in the next ch.
- Sk 2 ch. Work GC in the next ch.
First zigzag complete.
- Sk 5 ch to form a valley.
- Work GC in the next ch.
- Sk 2 ch. Work GC in the next ch.
- Sk 2 ch. Work (GC, ch 2, GC) in the next ch.
- Sk 2 ch. Work GC in the next ch.
- Sk 2 ch. Work GC in the next ch.
- Rep Steps 6–11 four more times.
You now have six peaks. There should be 3 ch left.
- Sk 2 ch.
- Work 1 dc in the final ch.
- Turn.
Count: 36 GC, 2 edge dc, and 6 ch-2 sps.
The GC contain 108 dc. With the two edge dc, the row has 110 dc, counting the starting chain as one dc.
Row 2 — Repeat Row
- Ch 3. This counts as the first edge dc.
- Sk the first gap between the edge dc and the nearest GC.
- Work GC in the next gap between two GC.
- Work GC in the next gap.
- Work (GC, ch 2, GC) in the next peak ch-2 sp.
- Work GC in each of the next 2 gaps.
- Sk the valley gap between the two GC at the bottom of the dip.
- Work GC in each of the next 2 gaps.
- Work (GC, ch 2, GC) in the next peak ch-2 sp.
- Work GC in each of the next 2 gaps.
- Rep Steps 7–10 four more times.
- Leave the final gap between the last GC and the edge dc unworked.
- Work 1 dc in the third ch of the starting chain from the previous row.
- Turn.
Count: 36 GC, 2 edge dc, and 6 ch-2 sps.
On Row 2, the valley gap lies above the five skipped foundation chains. On later rows, it lies between the two groups that meet at each dip.
Rows 3–108
Rep Row 2, following the stripe plan below.
Check the counts after the first few rows and after each color change:
- 6 peaks
- 5 valleys
- 36 GC
- 2 edge dc
Stripe Plan
Work each stripe for 6 rows.
| Rows | Color |
|---|---|
| 1–6 | A — Cream |
| 7–12 | B — Sage |
| 13–18 | C — Clay |
Rep this 18-row sequence five more times.
The blanket will have:
- 108 rows
- 18 stripes
- 36 rows in each color
After Row 108, fasten off.
Change Colors
At the final dc before a new stripe:
- Yarn over with the old color.
- Insert the hook into the stated edge stitch.
- Yarn over and pull up a loop.
- Yarn over and pull through 2 loops.
- Drop the old yarn on the WS.
- Yarn over with the new color.
- Pull through the last 2 loops.
- Cut the old yarn, leaving an 8-inch tail.
- Turn.
- Begin the next row’s ch 3 with the new color.
The final dc belongs to the stripe just finished.
Side Trim
This trim covers the two straight side edges. The top and bottom keep their zigzag shape.
First Side
With the RS facing, join A at one end of a straight side edge.
- Ch 1. This does not count as a st.
- Work 2 sc around the edge dc or ch-3 post of each row.
- Continue along all 108 row ends.
- Fasten off.
Starting trim count: 216 sc.
Lay the edge flat as you work. If it pulls inward, add a few evenly spaced sc. If it forms waves, remove a few. The final count may change with your tension.
Second Side
- Join A at the matching end of the other straight side.
- Ch 1.
- Work the same trim as on the first side.
- Match any stitch-count changes made on the first side.
- Fasten off.
Finishing
- Weave in all yarn ends on the WS.
- Remove the stitch markers.
- Wash as directed on the yarn label.
- If the yarn permits, lay the damp blanket on a clean, flat surface.
- Shape the peaks and dips with your hands.
- Smooth the side edges without stretching.
- Let the blanket dry fully before use.
The target size is about 42 × 54 inches, with small changes due to yarn, tension, and the side trim.