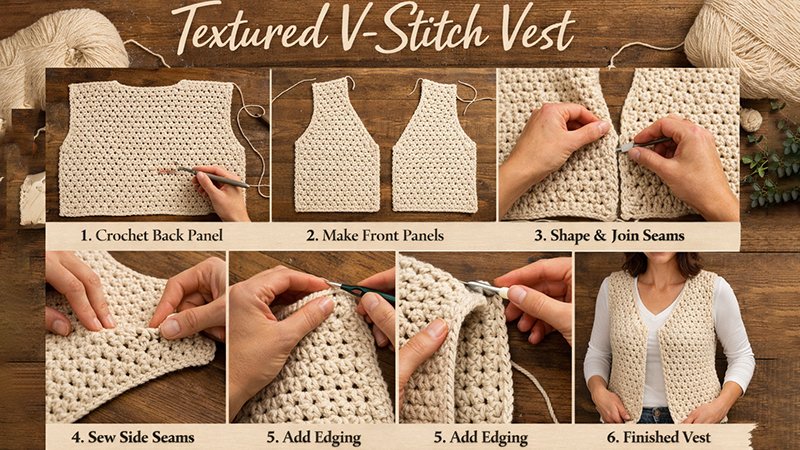
Create a beautifully layered wardrobe essential with this Textured V-Stitch Vest. This versatile piece features a flattering V-neckline, soft drape, and elegant texture created using the classic V-stitch pattern. Perfect for transitional weather, this vest can be styled over dresses, shirts, or lightweight sweaters.
Skill Level
Intermediate
Finished Size
Small (Medium, Large, XL)
Instructions are written for Small, with changes for other sizes in parentheses.
Materials
- Worsted weight yarn – 600 (700, 800, 900) grams
- Crochet hook size H/5.0 mm (or size needed to obtain gauge)
- Scissors
- Tapestry needle
- Stitch markers
Gauge
16 stitches x 9 rows = 4” in V-stitch pattern
Stitch Abbreviations
- ch – chain
- sl st – slip stitch
- sc – single crochet
- dc – double crochet
- st – stitch
- sp – space
- sk – skip
Special Stitch
V-Stitch (V-st): (dc, ch 1, dc) in indicated stitch or space
Back Panel
Step 1: Foundation Chain
Ch 70 (78, 86, 94).
This will form the width of your back panel.
Step 2: Row 1 (Setup Row)
Dc in 4th ch from hook (counts as first dc).
Ch 1, dc in same stitch (first V-st made).
Sk 2 ch, V-st in next ch.
Repeat from * to * across until last 2 chains.
Sk 2 ch, dc in last ch. Turn.
Step 3: Row 2
Ch 3 (counts as dc), ch 1.
Working in ch-1 spaces of each V-st across, place V-st in each ch-1 space.
At end of row, dc in top of turning chain. Turn.
Step 4: Repeat Pattern
Repeat Row 2 until piece measures 18 (19, 20, 21) inches from foundation edge.
Step 5: Shape Armholes
Ch 1, sc in first 3 (4, 5, 6) stitches to taper slightly.
Continue V-st pattern across until 3 (4, 5, 6) stitches remain.
Leave remaining stitches unworked. Turn.
Work even in V-st pattern for 7 (8, 8, 9) inches until armhole depth is achieved.
Fasten off.
Front Panels (Make Two)
Each front panel is worked separately and will form the V-neck shaping.
Step 1: Foundation Chain
Ch 36 (40, 44, 48).
Step 2: Row 1
Work same as Back Row 1.
Step 3: Row 2
Work same as Back Row 2.
Step 4: Begin V-Neck Shaping
To create the V-neck:
At the beginning of every right-side row:
- Work first V-st.
- Then sk next V-st space.
- Continue pattern across.
This gradual decrease forms the neckline slope.
Continue working decreases every other row until shoulder width matches back panel shoulder width.
Step 5: Armhole Shaping
Shape armhole on outer edge same as back panel by tapering 3 (4, 5, 6) stitches once.
Work even until front panel measures same length as back panel.
Fasten off.
Repeat for second front panel, mirroring shaping.
Shoulder Seams
Step 1
Place front panels on back panel, right sides facing.
Step 2
Using tapestry needle and yarn, sew shoulder seams neatly with whip stitch or mattress stitch.
Side Seams
Sew side seams from bottom edge upward, leaving 7–9 inches open for armholes (or desired opening).
Secure yarn and weave in ends.
Edging and Finishing
Step 1: Armhole Edging
Attach yarn at underarm seam.
Round 1: Sc evenly around armhole opening.
Sl st to join.
Round 2: Ch 1, sc evenly around.
Fasten off.
Repeat for second armhole.
Step 2: Front & Neck Edging
Attach yarn at bottom corner of right front panel.
Round 1:
Sc evenly up front edge, across back neckline, and down opposite front edge.
Place 3 sc in bottom corners to keep edges flat.
Sl st to join.
Round 2:
Ch 1, sc evenly around entire edge again.
Fasten off.
Blocking
Lightly block vest to measurements.
Lay flat to dry to enhance stitch texture and drape.
Styling Notes
This Textured V-Stitch Vest pairs beautifully with:
- Fitted long-sleeve tops
- Casual denim
- Layered bohemian outfits
- Belted waist styling
The V-stitch creates breathable fabric while maintaining warmth, making it ideal for spring and fall wear.
Care Instructions
- Hand wash in cold water
- Lay flat to dry
- Do not wring or twist
Design Tips
- For a longer vest, simply add additional rows before shaping armholes.
- For a cropped look, reduce total length by 2–3 inches.
- Try tonal yarn for a subtle texture or variegated yarn for bold dimension.
- Add wooden buttons along one side for optional closure.