Pattern Description:
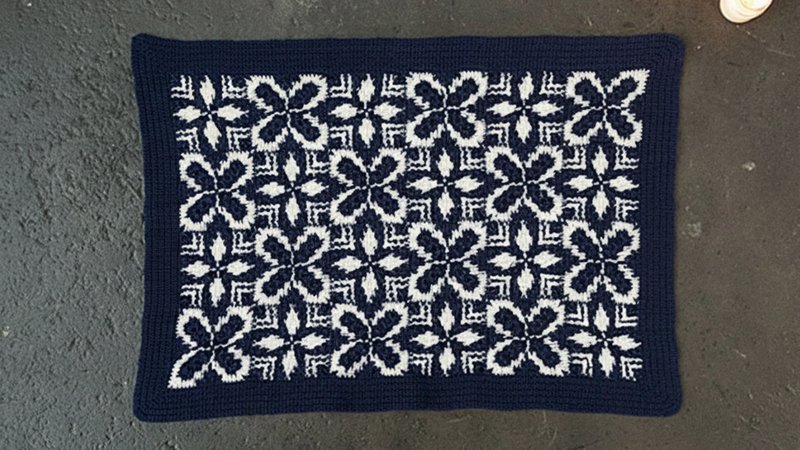
The Windrose Rug is an elegant home decor accent created using crochet tapestry squares combining two different patterns (Square A and Square B).
The squares are worked using Tapestry Double Crochet (TDC) and Tapestry Treble Crochet (Ttr) techniques.
The motifs are joined in an alternating 6 x 4 rectangle, and the rug is finished with a simple single crochet border.
Materials Needed & Measurements:
| Category | Detail | |
| Finished Measurements | 25″ wide x 35″ long | |
| Gauge | 1 Square = 5″ | |
| Hooks | US 7 (4.5 mm) Crochet hook or size needed to obtain gauge | |
| Yarn | Dishie™ (worsted weight, 100% Cotton; 190 yards/100g) | |
| MC (Main Color): Navy 26670, 5 skeins | ||
| C1 (Contrast Color 1): Swan 25409, 2 skeins | ||
| Notions | Yarn Needle |
Abbreviations (US Terms):
- beg – beginning
- ch(s) – chain(s)
- ch-sp – chain space
- DC – double crochet
- lp(s) – loop(s)
- MC – main color (Navy)
- C1 – contrast color 1 (Swan)
- rnd(s) – round(s)
- RS – right side
- SC – single crochet
- sl st – slip stitch
- st(s) – stitch(es)
- tr – treble crochet
- TDC – Tapestry Double Crochet (Special St)
- Ttr – Tapestry Treble Crochet (Special St)
- WS – wrong side
- YO – yarn over
- rep – repeat
Special Stitches (Special Sts)
Tapestry Double Crochet (TDC) Work DC with the working yarn, carrying the unused color inside the st.
- To change color: Work DC until there are 2 lps left on hook, YO with new color and pull through.
Tapestry Treble Crochet (Ttr) Work tr with the working yarn, carrying the unused color inside the st.
- To change color: Work tr until there are 2 lps left on hook, YO with new color and pull through.
Reverse Single Crochet (reverse SC) Working from left to right, insert hook from front to back in next st to the right, YO, pull up lp, YO, pull through 2 lps on hook.
Directions
Tapestry squares are worked separately and then joined in a 6 x 4 squares rectangle. Work following rnds in TDC, changing colors as shown in the Windrose Chart.
Instructions for Making the Windrose Rug Pattern:
Square A (Make 12)
- With C1, ch 4, sl st in first ch to form ring.
- Rnds will beg from the central st of the first edge of square.
- Work following rnds in TDC (see Special Sts), changing colors as shown in Windrose Chart – Quarter A.
- Rnd 1: Ch 3 (counts as a TDC throughout), Ttr in ring, [ch 2, Ttr, TDC, Ttr] in ring 3 times, ch 2, Ttr in ring, sl st in 3rd ch to join. (Count: 8 Ttr, 4 TDC, 4 ch-2 sps).
- Rnds 2-5: Ch 3, TDC in each st around, working (TDC, Ttr, ch 2, Ttr, TDC) in each ch-2 sp, sl st in 3rd ch to join. Fasten off. (Count at end of last rnd: 8 Ttr, 68 TDC, 4 ch-2 sps).
Square B (Make 12)
Rep Square A, following the Windrose Chart – Quarter B.
Joining
With WS facing, join Square A and Square B motifs using the mattress stitch, alternating patterns in a 6 x 4 rectangle.
Border (Work Tight)
The border is worked after all motifs are joined.
- With RS facing, join MC with sl st in the center of the long side of the rectangle.
- Row 1: Ch 1, [SC in each st and ch-sp to next corner, 2 SC in ch-2 sp at corner] 4 times, SC in each st to the end of row, turn.
- Row 2: Ch 1, [SC in each SC to next corner, 2 SC in last SC of edge, 2 SC in next SC] 4 times, SC in each SC to end of row, turn.
- Rep Row 2 until the border measures 2.5”.
- Final Row: With RS facing, reverse SC all sts.
Finishing
Sew the ends of the Border. Weave in ends and block the rug.