Whether you’re getting ready for Easter or simply want to create a sweet handmade gift, this bunny softie is a simple and rewarding project.
With no arms or legs to worry about, it’s beginner-friendly while still being customizable for more experienced sewers.
Choose Your Bunny Style
This pattern is flexible, so you can personalize your bunny:
- Floppy Ears (Beginner-Friendly):
The easiest option—just sew, turn, and leave them soft. - Poseable Ears (Intermediate Option):
Insert thin jewelry wire inside the ears so they can stand upright or bend into different shapes. - Two Size Options:
- Large Bunny: Great as a plush toy or basket centerpiece.
- Mini Bunny: Perfect for small gifts, decorations, or fitting inside Easter eggs.
Materials You’ll Need
Prepare everything before you begin:
Fabric & Structure
- Front Fabric: ½ yard (cotton or linen recommended)
- Back Fabric: ½ yard (faux fur, plush, or cotton)
- Interfacing: ½ yard (adds stability to the fabric)
Details & Filling
- Black yarn + needle OR iron-on vinyl (for the face)
- Fiberfill stuffing (cluster fill works best for smooth results)
- Pom-pom (for the tail)
- Jewelry wire (optional) for poseable ears
For Mini Version
- Fabric scraps or fat quarters are enough
Step-by-Step Instructions
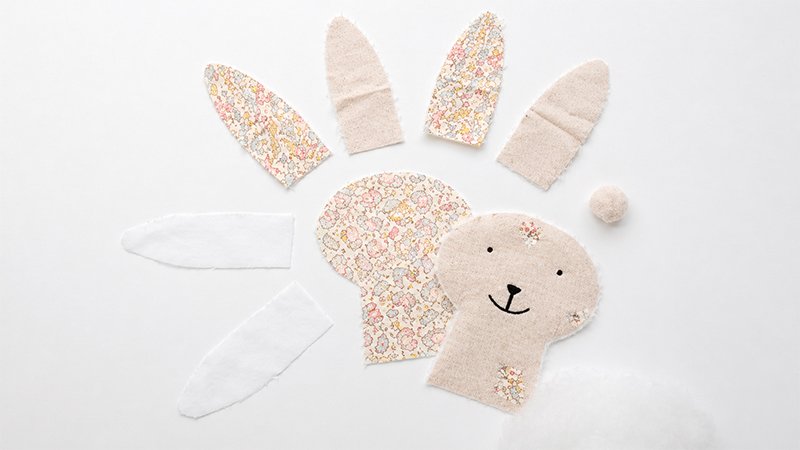
1. Prepare the Pattern
- Print the pattern at 100% scale (do NOT resize).
- For the large bunny:
- Tape the printed pages together carefully.
- Align edges accurately to maintain correct proportions.
- Cut out the pattern pieces.
2. Cut Fabric & Apply Interfacing
For each bunny, cut:
- 1 body piece (front fabric)
- 1 body piece (back fabric)
- 2 earpieces (front fabric)
- 2 earpieces (back fabric)
Then:
- Cut matching pieces from interfacing.
- Fuse interfacing to the wrong side of the front fabric pieces using an iron.
- This helps the bunny hold its shape.
3. Sew the Ears
- Place one front earpiece and one back earpiece right sides together.
- Sew around the edges using a ¼ inch seam allowance, leaving the bottom open.
- Carefully clip the tip (don’t cut through stitches).
- Turn the ear right side out using a turning tool or chopstick.
- Lightly press with an iron (avoid heat if using faux fur).
Optional (Poseable Ears):
- Bend jewelry wire slightly shorter than the ear length.
- Insert it into the ear before closing the bottom.
4. Add the Face
Before assembling the body:
- Use yarn or embroidery to stitch eyes and a nose
OR - Apply iron-on vinyl for a clean, modern look.
Tip: Lightly draw the face with a pencil first for placement.
5. Assemble the Bunny Body
- Place the ears at the top of the head, pointing downward (they’ll flip up later).
- Baste them in place.
Then:
- Place the front and back body pieces right sides together.
- Pin around the edges.
- Sew all the way around using a ¼ inch seam allowance, leaving a small opening at the bottom (for turning and stuffing).
6. Shape, Turn & Stuff
- Clip curves and corners carefully (this helps smooth shaping).
- Turn the bunny right side out.
- Push out edges gently using a blunt tool.
Now:
- Stuff firmly with fiberfill.
- Add small amounts at a time.
- Focus on the ears and corners first.
7. Close & Finish
- Close the bottom opening using a slip stitch (invisible hand stitch)
OR - Use a sewing machine if preferred.
Finally:
- Attach a pom-pom tail using fabric glue or hand stitching.
Tips for the Mini Bunny
- Interface both body AND ears for better structure.
- Add a small dart at the base of each ear so they stand nicely.
- Instead of hand stitching:
- Simply topstitch the bottom closed to save time.
- Use tweezers or a chopstick to help turn tiny pieces.
Extra Ideas
- Make a bunny family set (one large + several minis)
- Use patterned fabrics for unique designs
- Add ribbons, bows, or tiny scarves
- Turn minis into keychains or ornaments
This project is perfect for using leftover fabric and creating something charming and personal. Once you’ve made one, it’s hard to stop—try experimenting with different textures and colors next time.
Happy sewing!