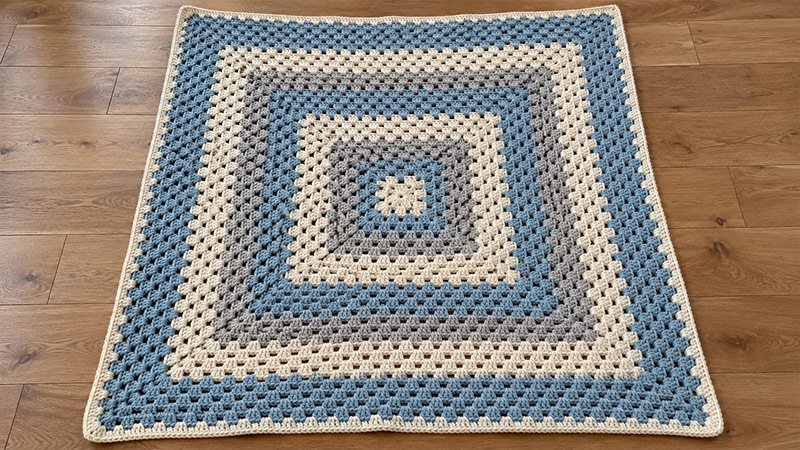
The Continuous Granny Square Blanket starts in the center. It grows in rounds from there. Groups of 3 dc form the cloth. Chain spaces sit between the groups. Four corners keep it square as each round grows.
You make the whole blanket in one piece. There are no squares to join. Use one shade or add stripes. You can use yarn left from past projects. A round of sc makes a neat edge.
The size and yarn needs are rough guides. Check your gauge before you start.
Pattern Details
Skill Level
Easy
You should know how to work ch, sl st, sc, and dc. The instructions explain where to place each group and how to form the corners.
Size
About 40 × 40 inches before the border, at the stated gauge.
The sc border adds about ½ inch to the total width and length.
Work fewer rounds for a small blanket or more rounds for a large throw.
Materials
- A 5.5 mm crochet hook, or the size needed to meet gauge.
- A yarn needle.
- Scissors.
- Four stitch markers, if needed, to mark the corners.
- A tape measure.
Yarn
Use worsted-weight yarn, Category 4.
Allow about 1,600–2,000 yards total for the stated size and border. Your yarn use will vary with gauge, fiber, and stitch height.
For a striped version, use three shades:
- Color A: Cream.
- Color B: Dusty blue.
- Color C: Soft gray.
Use yarns of the same weight with similar care needs. Outer rounds use more yarn than inner rounds, so equal numbers of rounds will not use equal amounts of each shade.
Abbreviations
US crochet terms
- ch: Chain.
- ch-1 sp: Chain-1 space.
- ch-2 sp: Chain-2 space.
- dc: Double crochet.
- sc: Single crochet.
- sl st: Slip stitch.
- st / sts: Stitch / stitches.
- sp / sps: Space / spaces.
- rnd / rnds: Round / rounds.
- rep: Repeat.
A 3-dc group means 3 dc worked into the same sp.
A corner means (3 dc, ch 2, 3 dc) worked into the same corner ch-2 sp.
Gauge
After 5 rnds, the square should measure about 5 × 5 inches, measured across the center after light blocking.
At this gauge, each added rnd increases the total width by about 1 inch.
If your square is too small, try a larger hook. If it is too large, try a smaller hook. The fabric should feel soft and bend with ease.
Pattern Instructions
Before You Begin
- Work in joined rnds. Keep the right side facing you.
- Do not turn between rnds.
- The starting ch 3 always counts as 1 dc.
- Work each 3-dc group in a chain space. Do not work into the tops of the dc.
- Ch 1 between groups on each side.
- Ch 2 in each corner.
- Join each rnd with a sl st. Place it in the top of the starting ch 3.
- Do not count sl sts used to join or move into place as sts.
Step 1: Make the Center Ring
- Ch 4.
- Sl st in the first ch to form a ring.
- Work the first rnd into the center of this ring.
Step 2: Work Rnd 1
- Ch 3. This counts as the first dc.
- Work 2 dc into the ring, then ch 2.
- Work (3 dc into the ring, ch 2) three times.
- Join with a sl st in the top of the starting ch 3.
Check: You should have four 3-dc groups and four ch-2 corner sps.
Place a marker in each corner sp if this helps you see them.
Step 3: Work Rnd 2
- Sl st in each of the next 2 dc. Sl st into the next ch-2 corner sp.
- Ch 3, then work (2 dc, ch 2, 3 dc) into that same sp. This forms the first corner.
- Ch 1.
- In each of the next three corner ch-2 sps, work:
- (3 dc, ch 2, 3 dc), ch 1.
- Join with a sl st in the top of the starting ch 3.
Check: You should have:
- Eight 3-dc groups.
- Four ch-2 corner sps.
- Four ch-1 side sps.
Step 4: Work Rnd 3
- Sl st in each of the next 2 dc. Sl st into the next ch-2 corner sp.
- Ch 3, then work (2 dc, ch 2, 3 dc) into the same sp.
- Ch 1.
- Work 3 dc in the next ch-1 sp, then ch 1.
Repeat the following sequence three times:
- Work (3 dc, ch 2, 3 dc) in the next corner ch-2 sp. Ch 1. Work 3 dc in the next ch-1 sp. Ch 1.
- Join with a sl st in the top of the starting ch 3.
Check: You should have twelve 3-dc groups, four corner sps, and eight ch-1 side sps.
Step 5: Work Rnd 4
- Sl st in each of the next 2 dc. Sl st into the next ch-2 corner sp.
- Ch 3, then work (2 dc, ch 2, 3 dc) into that same sp.
- Ch 1.
- Work (3 dc in the next ch-1 sp, ch 1) twice. You have reached the next corner.
- Repeat the following sequence three times:
- Work (3 dc, ch 2, 3 dc) in the next corner ch-2 sp. Ch 1. Work (3 dc in the next ch-1 sp, ch 1) twice.
- Join with a sl st in the top of the starting ch 3.
Check: You should have sixteen 3-dc groups, four corner sps, and twelve ch-1 side sps.
Step 6: Work Rnds 5–40
For each new rnd:
- Sl st in each of the next 2 dc. Sl st into the next corner ch-2 sp.
- Ch 3. Work (2 dc, ch 2, 3 dc) in that same corner sp.
- Ch 1.
- Work (3 dc in the next ch-1 sp, ch 1). Rep across the side to the next corner.
- Work (3 dc, ch 2, 3 dc) in the next corner sp. Ch 1.
- Rep Steps 4–5 around the square. Once all four corners are done, work Step 4 across the last side.
- Join with a sl st in the top of the starting ch 3.
Stop after Rnd 40, or when the blanket is the size you want.
Do not work in the gaps between single dc sts. Use just the ch-1 side sps and ch-2 corner sps.
Check Your Group Count
Each rnd adds four 3-dc groups to the blanket.
| Completed rnd | Total 3-dc groups | Total dc, including starting ch 3 |
|---|---|---|
| 1 | 4 | 12 |
| 2 | 8 | 24 |
| 3 | 12 | 36 |
| 4 | 16 | 48 |
| 5 | 20 | 60 |
| 10 | 40 | 120 |
| 20 | 80 | 240 |
| 40 | 160 | 480 |
Every rnd has four ch-2 corner sps. On Rnd 2 and later, each side has one more ch-1 sp than it had on the prior rnd.
Step 7: Change Colors
For broad stripes, use this sequence:
- Rnds 1–5: Color A.
- Rnds 6–10: Color B.
- Rnds 11–15: Color C.
- Rnds 16–20: Color A.
- Rnds 21–25: Color B.
- Rnds 26–30: Color C.
- Rnds 31–35: Color A.
- Rnds 36–40: Color B.
To change colors:
- Finish the rnd and join as usual.
- Cut the yarn, leaving a tail of about 6 inches. Fasten off.
- Join the new yarn with a sl st in any corner ch-2 sp.
- Ch 3, then work (2 dc, ch 2, 3 dc) in that same sp.
- Continue the rnd as written.
When you join a new shade in a corner, skip the positioning sl sts at the start of that rnd.
Step 8: Add the Border
Finish the last granny rnd and fasten off.
- Join your border yarn with a sl st in any corner ch-2 sp.
- Ch 1. This does not count as a st.
- Work 3 sc in the same corner sp.
Continue around the blanket:
- Work 1 sc in each dc.
- Work 1 sc in each ch-1 sp.
- Work 3 sc in each corner ch-2 sp.
Treat each starting ch 3 from the last granny rnd as one dc. Work 1 sc into its top.
After the last side, join with a sl st in the first sc. Do not work into the old joining sl st.
Fasten off, leaving a tail of about 6 inches.
Step 9: Finish the Blanket
Use a yarn needle to weave each tail through the backs of several sts. Change direction as you weave so the ends stay in place.
Lay the blanket flat and gently shape the sides and corners.
Block it as allowed by the yarn label. Do not stretch the corners into points. Let the blanket dry fully before you fold or use it.
Adjust the Size and Shape
For a smaller blanket, stop at the end of any full granny rnd. For a larger blanket, keep repeating Step 6 before adding the border.
Lay the work flat every few rnds. If an edge pulls inward, check for a missed ch-1 sp or group. If the edge forms waves, check for extra groups or loose chains.
Keep all four corners the same: (3 dc, ch 2, 3 dc). This keeps the increases even as the blanket grows.